TL;DR: Grab a Mac Mini M2 or a Mac Mini M2 Pro if you want to generate images faster, then download MochiDiffusion and start generating your images at home. Note: I’m using referral links in this post, so if you buy something I might receive a commission.
Stable Diffusion is a deep learning model that allows you to generate images by simply writing a text prompt, like this:

Before the release of Stable Diffusion, you would have needed to access cloud services to generate images like this. Some of the most popular ones are DALL-E and Midjourney.
Now, you’re able to do this with your own hardware. Usually, this would require you to setup a rather expensive PC with a powerful GPU, but with the latest research from Apple, you’re now able to run Stable Diffusion with Core ML on their new ARM devices(M1, M2, etc).
The base configuration of the newly released Mac Mini M2 is the best deal you can get in terms of the cheapest device that can be used with Stable Diffusion. But if you want to have faster generation of images, then the Mac Mini M2 Pro is an incredible device that runs faster and comes with more RAM and more disk space, which is handy since each of these models is quite large. Also, keep in mind that you might be able to find the older Mac Mini M1 at good prices. Any of these devices are able to run Stable Diffusion, the main difference would be the speed in which they do it.
Now, to be able to run Stable Diffusion on the Mac Mini natively, you’ll need to download an application called MochiDiffusion. After you install it, you’ll also need to download a Stable Diffusion model, prepared specially for Core ML. You can find some ready to use models here. In particular, you want to get the split_einsum version of the model, which is the one compatible with the Neural Engine of the Mac Mini. For example, if you want the latest Stable Diffusion model, which is 2.1, you can find it here. Simply unzip the file and place it under /Users/YOUR_USERNAME/Documents/MochiDiffusion/models.
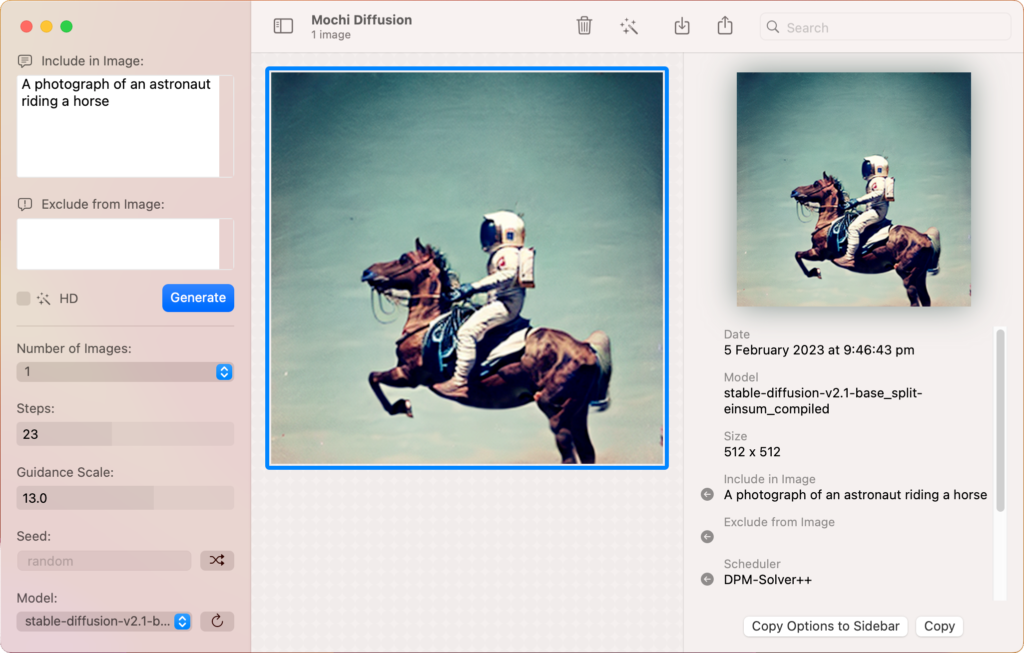
You can now simply write your prompt where it says “Include in Image:“, and also you can write stuff you don’t want to see in the “Exclude from image:” box. When you’re asked about the Compute Unit option, make sure to select “Use Neural Engine” as we’re using the split_einsum models.
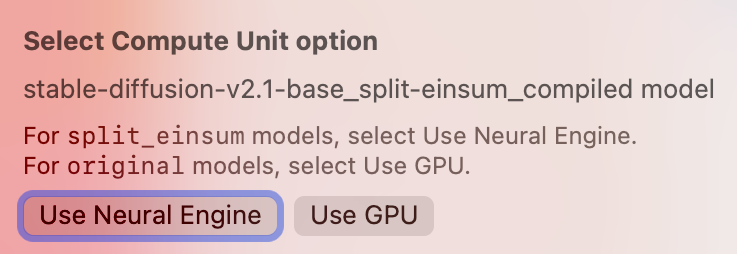
Now you’re ready to generate your first image, simply click Generate and wait. When you click Generate for the first time after you load a model, it will take some extra time to compile it and optimise it for your device. After this is done, it will generate the next images much faster. Once the image appears on the screen, you can simply select it and click on the icon with the arrow pointing down at the top to save it.
The generated images are 512×512, but you have the option to check the HD box to enlarge your images in generation time to 2024×2024 using Real-ESRGAN. You can also enlarge the images later if you select them and click on the magic wand icon on top. And that’s really all you need to start generating images with your Mac Mini. Enjoy!



0 Responses
Stay in touch with the conversation, subscribe to the RSS feed for comments on this post.