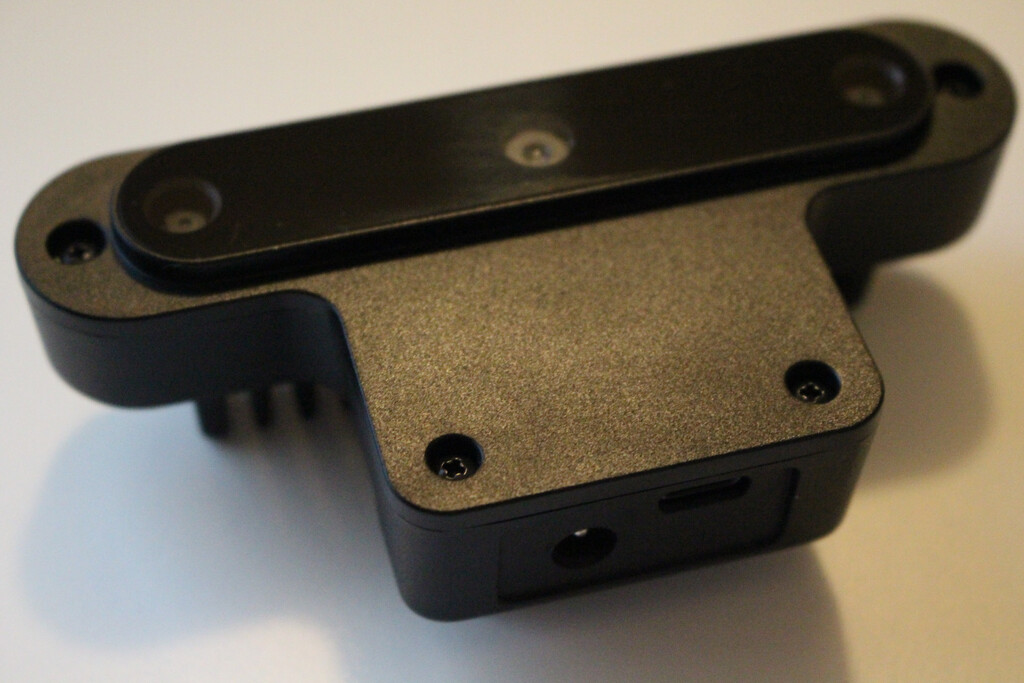
The Luxonis Oak-D(affiliate link) is a great infrared stereo camera. It also comes with an RGB camera, and the Intel Movidius MyriadX chip to perform neural inference inside the device. They’ve named it a “spatial camera” because of all these features. It’s quite a bargain for its price, and it’s also quite compact, so it’s perfect for robotic and computer vision applications in general. If you don’t have one of these cameras and would like to get one, check out this blog post.
In this post I’ll show you how to start using it in Ubuntu to make your own computer vision applications with OpenCV. First, let’s make sure you have an updated system:
sudo apt-get update
sudo apt-get upgrade
Now let’s get some dependencies that are needed to build the Oak-D library and the examples:
sudo apt-get install cmake build-essential git libopencv-dev
Now we’re ready to grab the source code, compile it, and install it:
cd ~
mkdir oakd
cd oakd
wget https://github.com/luxonis/depthai-core/releases/download/v2.20.2/depthai-core-v2.20.2.tar.gz
tar -xzvf depthai-core-v2.20.2.tar.gz
cd depthai-core-v2.20.2/
mkdir build
cd build
cmake -D BUILD_SHARED_LIBS=OFF -D DEPTHAI_BUILD_EXAMPLES=ON -D DEPTHAI_OPENCV_SUPPORT=ON -DCMAKE_INSTALL_PREFIX=/usr/local ..
make -j10
sudo make install
Now the camera library is installed, but it is only accessible using sudo, so let’s set the udev rules to allow normal users to access it(make sure to disconnect the camera now):
echo 'SUBSYSTEM=="usb", ATTRS{idVendor}=="03e7", MODE="0666"' | sudo tee /etc/udev/rules.d/80-movidius.rules
sudo udevadm control --reload-rules && sudo udevadm trigger
And now connect the camera again, the new rules should apply, and a normal user should be able to access it. Try running some of the demos(you can press q to exit):
cd ~/oakd/depthai-core-v2.20.2/build/examples
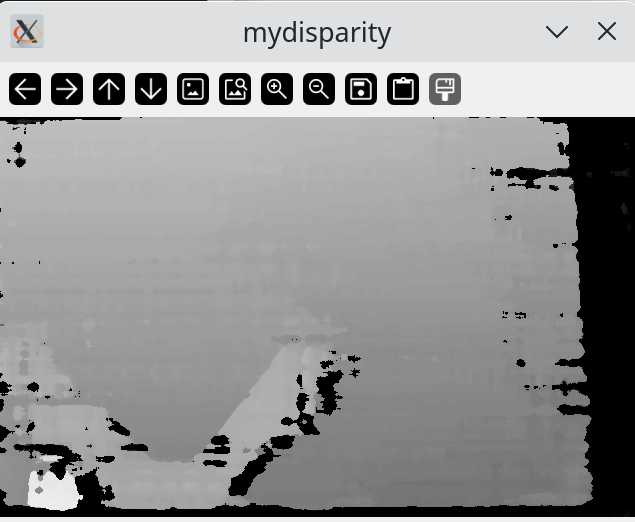
./depth_preview
./rgb_preview
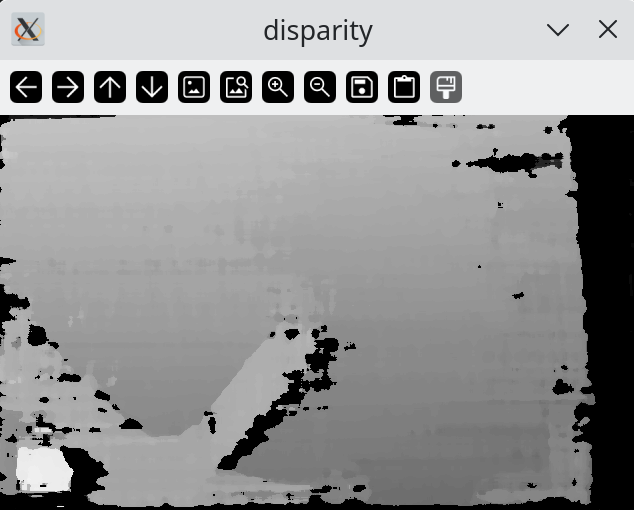
In the depth preview you’ll see gray scale pixels representing depth. The closer the pixel is to the camera, the higher value(whiter) it would be. The RGB preview simply shows the RGB camera. Make sure to explore the rest of the examples to see the capabilities of the camera.
The simplest way to build your own application is to copy one example and use it as the starting point, using the same building pipeline. For example, let’s write an app that gets the depth data like the depth_preview example:
cd ~/oakd/depthai-core-v2.20.2/examples
mkdir myapp
cd myapp
cp ../StereoDepth/depth_preview.cpp main.cpp
We now have a main.cpp file with the code for our application. Make a tiny change to the code so that you know it’s a different file, open main.cpp and make this change:
//cv::imshow("disparity", frame)
cv::imshow("mydisparity", frame)
Now let’s add our application to the building pipeline, alongside the other examples. Edit this file:
nano ~/oakd/depthai-core-v2.20.2/examples/CMakeLists.txt
At the end of the file, simply write this one line and save the file:
dai_add_example(my_oak_app myapp/main.cpp ON)
my_oak_app is the name of your executable, and myapp/main.cpp is where the source code is. Let’s build it and run it:
cd ~/oakd/depthai-core-v2.20.2/build/
make
cd examples
./my_oak_app
You should now see the same depth_preview application but the window name should be “mydisparity” instead.
That’s it, remember to explore the other examples, and also check out the Luxonis C++ API Reference to see all that you can do with these incredible cameras.
Enjoyed the tutorial?


One Response
Stay in touch with the conversation, subscribe to the RSS feed for comments on this post.
Continuing the Discussion