UPDATE: You can also install OpenCV 4.7.0 in Ubuntu 22.04LTS.
The latest Long Term Support version of Ubuntu(14.04 LTS) is out and a new version of OpenCV was recently released as well. This means that now is a great opportunity to update my OpenCV installation guide to the latest versions, Ubuntu 14.04 LTS and OpenCV 2.4.9.
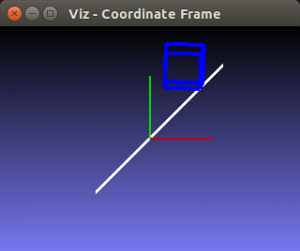
One of the great additions in this new release of OpenCV is the new viz module, which offers a nice 3D visualizer. This module is based on the great Visualization Toolkit library (VTK) and nicely prepares the users for the upcoming OpenCV 3.
In this guide, I will show you how to install OpenCV with a lot of the features it provides. Here are some of the things that are going to be enabled when you are finished following through with this installation tutorial:
- viz module (3D visualization)
- Qt version of the HighGUI module (Better 2D window interface with zoom, image saving capabilities, etc)
- OpenGL support
- C++ interface and examples
- C interface and examples
- Python interface and examples
- Java interface and examples
- Intel Threading Building Blocks (TBB)
Note: I have noticed some copies of my posts elsewhere, so make sure that you are reading this from the original source, at samontab dot com, accessible from here so that you don’t miss the comments.
OK, so the first step is to make sure that everything in the system is updated and upgraded. Open the terminal and write this:
sudo apt-get update sudo apt-get upgradeNow, you need to install many dependencies, such as support for reading and writing image files, drawing on the screen, some needed tools, other libraries, etc… This step is very easy, you only need to write the following command in the Terminal:
sudo apt-get install build-essential libgtk2.0-dev libjpeg-dev libtiff4-dev libjasper-dev libopenexr-dev cmake python-dev python-numpy python-tk libtbb-dev libeigen3-dev yasm libfaac-dev libopencore-amrnb-dev libopencore-amrwb-dev libtheora-dev libvorbis-dev libxvidcore-dev libx264-dev libqt4-dev libqt4-opengl-dev sphinx-common texlive-latex-extra libv4l-dev libdc1394-22-dev libavcodec-dev libavformat-dev libswscale-dev default-jdk ant libvtk5-qt4-devTime to get the OpenCV 2.4.9 source code:
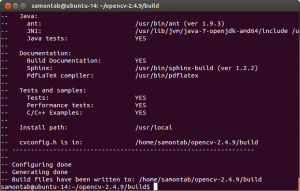
cd ~ wget http://sourceforge.net/projects/opencvlibrary/files/opencv-unix/2.4.9/opencv-2.4.9.zip unzip opencv-2.4.9.zip cd opencv-2.4.9Now we have to generate the Makefile by using cmake. In here we can define which parts of OpenCV we want to compile. Since we want to use the viz module, Python, Java, TBB, OpenGL, Qt, work with videos, etc, here is where we need to set that. Just execute the following line at the terminal to create the appropriate Makefile. Note that there are two dots at the end of the line, it is an argument for the cmake program and it means the parent directory (because we are inside the build directory, and we want to refer to the OpenCV directory, which is its parent).
mkdir build cd build cmake -D WITH_TBB=ON -D BUILD_NEW_PYTHON_SUPPORT=ON -D WITH_V4L=ON -D INSTALL_C_EXAMPLES=ON -D INSTALL_PYTHON_EXAMPLES=ON -D BUILD_EXAMPLES=ON -D WITH_QT=ON -D WITH_OPENGL=ON -D WITH_VTK=ON ..
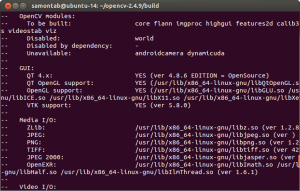
Check that the above command produces no error and that in particular it reports FFMPEG as YES. If this is not the case you will not be able to read or write videos. Check that Java, Python, TBB, OpenGL, V4L, OpenGL and Qt are all detected correctly.
Make sure you scroll up and check that the modules that are going to be built are these:
core flann imgproc highgui features2d calib3d ml video legacy objdetect photo gpu ocl nonfree contrib java python stitching superres ts videostab viz.If anything is wrong, go back, correct the errors by maybe installing extra packages and then run cmake again.
Now, you are ready to compile and install OpenCV 2.4.9:
make sudo make installNow you have to configure OpenCV. First, open the opencv.conf file with the following code:
sudo gedit /etc/ld.so.conf.d/opencv.confAdd the following line at the end of the file(it may be an empty file, that is ok) and then save it:
/usr/local/lib
Run the following code to configure the library:
sudo ldconfigNow you have to open another file:
sudo gedit /etc/bash.bashrcAdd these two lines at the end of the file and save it:
PKG_CONFIG_PATH=$PKG_CONFIG_PATH:/usr/local/lib/pkgconfig export PKG_CONFIG_PATH
Finally, close the console and open a new one, restart the computer or logout and then login again. OpenCV will not work correctly until you do this.
Now you have OpenCV 2.4.9 installed in your computer with 3D visualization, Python, Java, TBB, OpenGL, video, and Qt support.
Check out the cool Qt interface which provides image viewing capabilities with zoom, as well as the ability to save the current image with just one click.
If you zoom in enough, you can see the RGB (or intensity) values for each pixel.
Now let’s build some samples included in OpenCV:
cd ~/opencv-2.4.9/samples/c chmod +x build_all.sh ./build_all.shThese examples use the old C interface:./facedetect --cascade="/usr/local/share/OpenCV/haarcascades/haarcascade_frontalface_alt.xml" --scale=1.5 lena.jpg
./facedetect --cascade="/usr/local/share/OpenCV/haarcascades/haarcascade_frontalface_alt.xml" --nested-cascade="/usr/local/share/OpenCV/haarcascades/haarcascade_eye.xml" --scale=1.5 lena.jpg
The following examples use the new C++ interface:
~/opencv-2.4.9/build/bin/cpp-example-grabcut ~/opencv-2.4.9/samples/cpp/lena.jpg
~/opencv-2.4.9/build/bin/cpp-example-calibration_artificial
Now let’s run some Python code:
python ~/opencv-2.4.9/samples/python2/turing.py
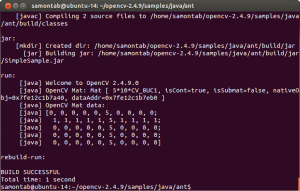
Now you can build a Java sample using ant for example. (Make sure that you change /home/samontab/ with your actual home directory):
cd ~/opencv-2.4.9/samples/java/ant ant -DocvJarDir=/home/samontab/opencv-2.4.9/build/bin -DocvLibDir=/home/samontab/opencv-2.4.9/build/lib
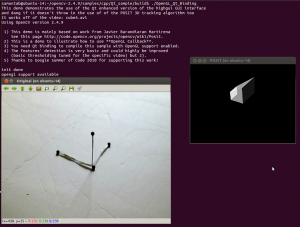
Now let’s read a video and use OpenGL with Qt through this great sample that detects the features from the video, then estimates the 3D location of the structure using POSIT, and finally uses OpenGL to draw in 3D (great sample Javier):
cd ~/opencv-2.4.9/samples/cpp/Qt_sample mkdir build cd build cmake .. make ./OpenGL_Qt_Binding
And finally, let’s build a sample using the 3D visualization module viz:
cd ~/opencv-2.4.9/samples/cpp/tutorial_code/viz g++ -o widget_pose `pkg-config opencv --cflags` widget_pose.cpp `pkg-config opencv --libs` ./widget_pose
As you can see, now you can use OpenCV with C++, C, Python, and Java. The Qt enhanced 2D interface is enabled, 3D data can be displayed using OpenGL directly, or using the new viz module. Multi threading functionality is enabled using TBB. Also, video support is enabled as well.
If you correctly finished this tutorial, you are now ready to do some nice computer vision work.


Thank you for your guide. I had really problems to get OpenCV work before and tried a bunch of other guides, but only yours worked in the end ;)
You are welcome Jo. Great to hear that it worked for you.
Thanks for share.
I was installing the OpenCV 2.4.9 in a cubieboard, with cubian (a debian fork) and with the help of your guide, it solve an issue.
Thanks a great job
Good job Pablo,
Thanks for letting me know that this guide can also be applied to a cubieboard.
I had mailed you a few days ago and while I managed the visualisation in matlab, this way of doing it with an integrated vtk is better. Thanks a ton for your help. :)
Thanks Arbaaz Khan,
I am glad it helped you.
And, of course it is better, it is open source :)
I’m having trouble with the reading a video through OpenGL and Qt. When I write the command ./OpenGL_Qt_Binding it says no such file exists. Also during build it shows support for qt and opengl and ffmpeg. What could the problem be ?
Hi Arbaaz Khan,
You are not providing enough information to generate a helpful answer.
Most probably you missed a step, or you are using a different version of Ubuntu.
From what you are saying, it may be that the executable is not being created for some reason. Do the other examples work?.
Did you actually log out and log in again?
Just follow every single step, line by line carefully in a fresh install of Ubuntu 14.04 LTS and it should just work.
Your tutorial is great. But I have a error. This appear in the terminal.
Linking CXX executable ../../bin/opencv_traincascade
CMakeFiles/opencv_traincascade.dir/traincascade.cpp.o: no se reconoce el fichero: Fichero truncado
collect2: error: ld returned 1 exit status
make[2]: *** [bin/opencv_traincascade] Error 1
make[1]: *** [apps/traincascade/CMakeFiles/opencv_traincascade.dir/all] Error 2
make: *** [all] Error 2
1000 blessings upon you for posting this.
I get mostly thru , then hit
“…By not providing “FindQt5Core.cmake” in CMAKE_MODULE_PATH this project has
asked CMake to find a package configuration file provided by ‘Qt5Core’, but
CMake did not find one…”
upon trying the cmake. I did
sudo apt-get install libboost-all-dev
rm CMakeCache.txt
and then the cmake again, same problem :{
no clear answer on web search of that problem..
Hello Jeremy,
That is actually not an error, just a warning. It says that it can’t find Qt5, which is correct as it is not installed.
That is fine as we are going to be using Qt4, which should be correctly installed and detected.
Just ignore that message and continue, it should work as expected.
Hello Toño,
It seems that you have an incomplete download, or the file is somehow truncated.
Try doing everything from scratch, and make sure that your download is complete.
Hi
Thank you for your great tutorial for installing Opencv. I just encountered with problem in step cmake. I did it again but before this step several kinds of python were installed.
I just have a problem now regarding samples. I ran all samples except one. everything has been done according to your tutorial but when running sample for OpenGL. I receive this problem : bash: ./OpenGL_Qt_Binding: No such file or directory
:~/opencv-2.4.9/samples/cpp/Qt_sample/build$ ls
CMakeCache.txt CMakeFiles cmake_install.cmake cube4.avi Makefile
Hi
I wanted to test the core of Opencv by ./opencv_core_test
at the end of the test just at the end it got a failed test reporting:[ FAILED ] 1 test, listed below:
[ FAILED ] Core_globbing.accuracy . what is a problem? by the way I still have got my previous question posed in the other discussion forum in terms of one of samples using opengl. i executed all of samples after installing except this one. the output terminal says there is not opengl Qt directory in the made build.
Best
Hi Seyedmajid,
It seems that you missed the make step.
Hi Seyedmajid,
There is nothing wrong with the code.
The error in the test appears because testing is not completely setup.
In particular, that test checks for particular files in OPENCV_TEST_DATA_PATH, but that path is not set. Nothing to worry about.
If you want to learn more about that, take a look here:
http://code.opencv.org/projects/opencv/wiki/CodingStyleGuide#Implementing-tests
Hi
Great tutorial. Unfortunately I also am having trouble when it comes to reading a video with OpenGL and Qt. This is the error I get.
bash: ./OpenGL_Qt_Binding: No such file or directory
Is removing and re-installing the only option? I mean everything else works.
Hi Umar,
It means that the file is not there. Maybe you had a compilation issue or maybe you forgot a step or two.
Thanks for a speedy reply!
But here is whats funny here. The file actually does exits. By the name of OpenGL_Qt_Binding.dir , it exists in the CMakeFiles folder. What I don’t get is why it isn’t being recognized
A few people have commented on the video / OpenGL / Qt example. I also had problems, the example code seems to be missing a “make” command which builds the example and creates the file OpenGL_Qt_Binding, which can then be executed.
I think the sample code for that section should look like this:
cd ~/opencv-2.4.9/samples/cpp/Qt_sample
mkdir build
cd build
cmake ..
make
./OpenGL_Qt_Binding
Cheers. Really great guide. I had been unable to get OpenCV running on 14.04 until this guide.
Hi Umar,
You need to make the executable first. I was missing one line in the tutorial, I just updated it.
Thanks for spotting it RobM. I just updated the tutorial.
Hello sam, thanks for posting this great tutorial!
So while following steps everything went great until i tried building the samples using:
1 cd ~/opencv-2.4.9/samples/c
2 chmod +x build_all.sh
3 ./build_all.sh
After which I start getting bombarded with errors similar to:
compilation terminated.
compiling smiledetect.cpp
Package opencv was not found in the pkg-config search path.
Perhaps you should add the directory containing `opencv.pc’
to the PKG_CONFIG_PATH environment variable
No package ‘opencv’ found
Package opencv was not found in the pkg-config search path.
Perhaps you should add the directory containing `opencv.pc’
to the PKG_CONFIG_PATH environment variable
No package ‘opencv’ found
smiledetect.cpp:1:43: fatal error: opencv2/objdetect/objdetect.hpp: No such file or directory
#include “opencv2/objdetect/objdetect.hpp
Where did I go wrong?
Hello Rushil,
It seems to me that the startup scripts were not called. Maybe you forgot to logout and login, or restart the machine before continuing the tutorial.
Try this command:
pkg-config --libs opencvIt should tell you where the OpenCV libraries are installed. If that does not work, fix it by looking at that part of the tutorial, otherwise the buildall.sh will not work.
Hey sam,
I had not installed all the VTK packages.
I downloaded them and it works like a charm now.
Cheers!
hello i really need ur help
my system is 12.10 and i get cmake warning
Looking for ffmpeg/avformat.h – not found
i really need your help please..
Nice tutorial although it is missing additional information on some quite notorious issues such as the FFMPEG support. OpenCV usually (always? :D) requires some older version of the FFMPEG library that is currently installed on most people’s systems so you are quite often forced to seek out which version exactly you have to download, build and install in order for the OpenCV’s compilation procedure not to throw some poop in your face with FFMPEG somewhere between the lines in the resulting error messages. Some of the header files are also often not found concering:
linux/videodev.h
linux/videodev2.h
sys/videoio.h
libavformat/avformat.h
ffmpeg/avformat.h
Some of these can be resolved by manually editing as a root various files but it is ugly and tedious. I’m currently using Debian Wheezy and of course these issues are present. Switched from Ubuntu 12.04 LTS quite recently and there these very same problems were also present. If you look on the internet you will see that most people, who claim that their compilation process was successful, actually have these problems (you can catch their nonsense by looking at their terminal output of the cmake and make phases if any were provided). I’m curious if you had the same issues. If not, you are one hell of a lucky guy! LOL
Hi RB,
I actually did not find any issue at all. I am using the standard FFMPEG libraries from the Ubuntu repositories and it is working fine.
I wouldn’t call it luck though, just documenting what I am doing and reproducing it from scratch to make sure that it works.
Here for example I was using an older version of FFMPEG:
http://www.samontab.com/web/2011/06/installing-opencv-2-2-in-ubuntu-11-04/
Great to hear that it worked Rushil
You can try building FFMPEG:
http://www.samontab.com/web/2011/06/installing-opencv-2-2-in-ubuntu-11-04/
Hi. What should I do to configure Qt project for using with opencv?
Hi Andrew,
Just create a makefile for your project. Once you do that, you will be able to open that file with Qt.
Thank you for this elaborate guide, Sebastian! I hear that when working with Python, it is suggested to use virtual environments whenever possible. Can you, please, point out how to correctly install OpenCV in a Python virtualenv?
Well, it worked, thanks for the time you spent.. keep following your site, keep new things posted………..
Is this method still working in the case of ubuntu 64bit?
Can you make a tutorial on how to configure codeblock IDE with openCV 2.4.9
when i make it turns out errors that “relocation R_X86_64_32 against `.rodata.str1.1′ can not be used when making a shared object; recompile with -fPIC” can you help me? thank you
Hi Omar,
I created the guide using Ubuntu 14.04 LTS 64 bits, so it should work.
Codeblocks is just an IDE, so it should work exactly the same as with any other library.
Thanks Ganesh Babu
Thanks Passiday,
Using this guide you will have python and OpenCV installed system wide. I haven’t installed it on a python virtual environment, so I don’t have the instructions for you, sorry.
Hi wang qaing,
Well, you are either compiling it with other options, or in another environment or OS since it should just work.
You could try adding -fPIC to the compilation line as suggested by the compiler.
Thank you for the guide. I tried it and I works.
I’m using Qt Creator like IDE, I can compile openCV files but the windows of OpenCV doesn’t show it.
Could you help me?
Thank you very much, finally it worked for my UBUNTU 14.04 ,However it cost me 2 days but, a nice experience.
Amazing guide. Thanks a lot!
Thousand likes for the great tutorial thanks for making our life easier.
Thanks Sebastian. This is a great guide.
I’ve created a docker image using it: https://github.com/stbutler11/docker-opencv.
Thanks for the guide, It was very useful. But I still have
some problems with it. I have a laptop with a cuda capable
card with cuda 6.5 version, I got the installation to work but
when I try to compile the examples, the following is shown:
/usr/bin/ld: no se puede encontrar -lcufft
/usr/bin/ld: no se puede encontrar -lnpps
/usr/bin/ld: no se puede encontrar -lnppi
/usr/bin/ld: no se puede encontrar -lnppc
/usr/bin/ld: no se puede encontrar -lcudart
collect2: error: ld returned 1 exit status
If you could help me It would be great. Thanks in advance.
PD: The installation worked but I had to modify NCVPixelOperations.hpp
source code.
Hi Hector,
The compiler can’t find those libraries. It seems that they are all related to cuda. Check that you have enabled the cuda module in the compilation of opencv, and that the cuda libraries are correctly installed system wide, or if not, add the cuda libs path to the compiler with -L/path/to/cuda/libs in the compilation line.
from cv import *
ImportError: No module named cv
i try tu sample program which included in the package, but i got the above given error type.
I follow all the installation steps given by you.
Just wanted to say thank you! Great guide. Works perfect!
You are welcome StonJarks
Hi loijing,
It does not find the cv module. Probably you missed one of the steps of the tutorial.
Check that BUILD_NEW_PYTHON_SUPPORT=ON and that you already restarted the pc (or logout-login)
Hi Hector,
I don’t have access to a cuda enabled machine at the moment, so I can’t really give you an exact answer but it seems that the linker is not finding the cuda libraries.
You would need to do something like this:
g++ main.cpp -L/path/to/cudalibs -lcufft -lnpps ... etc...Where -L is specifying a path for the libraries that you want to use. That’s the path that the linker is not getting.
If you don’t know where the libraries are, you can try with something like this:
locate libcufftThat should tell you where that file is.
And of course, make sure that you have the development libraries for cuda installed!.
PS: What were the changes that you made to NCVPixelOperations.hpp?, maybe somebody else will need that as well.
Hi Sebastian
Thanks so much for putting a usable guide together, that just works! :-) I have used your previous for 12.04 also and that worked flawlessly too…
You write (in relation to dependencies): “This step is very easy, you only need to write the following command in the Terminal”. Very true, but are you prepared tell us a little more on how you worked out what the dependencies are/should be? That is the crucial part for me and I feel I would be much more productive if I could figure all that out for myself…
Thanks again and keep up the good work! ;-)
Hello Paul,
Thanks for your kind words.
In regards what you are asking, it is usually just experience with linux in general. You get to know which libraries are needed for certain things. Also, there are a few libraries or programs that are very specific to the actual version that you are installing and that you have to research a bit to get them.
For example, things like cmake or build-essential are almost always needed to build anything. Other libraries are relatively common like libjpeg-dev libtiff4-dev, which allow reading and writing jpeg and tiff image formats for example. By the way, generally the packages that end with “-dev” install the development files for that program.
Also, you could try using cmake-gui which is a GUI for cmake and lists all the option the program has (if it using cmake). That way you can have an idea of what libraries it should need.
And lastly, I recommend you using virtual machines as you can always create snapshots, try something, and go back in time if something went wrong, or you don’t know how to undo something you did.
When using make i just receive the following answer:
-bash: make: command not found
Hi hamzeh,
You probably skipped the initial installation of the needed tools. At least you should install this to have make:
sudo apt-get install build-essentialthanks!!!
Thank you very much. I just follow your step, it works very well.
I also set OPENNI on, which is often used with Kinect.
I follow this post
http://choorucode.com/2013/07/23/how-to-build-opencv-with-openni-on-ubuntu/
It will be great if you can also combine this one into your post, then it is more comprehensive.
god,may be you can add pcl with all of about you compile.
thank you very much
but i still need your help because there is somthing wronge
i insall this command “sudo apt-get install build-essential” but it doesn’t generate makefile
when i use this “cmake -D WITH_TBB=ON -D BUILD_NEW_PYTHON_SUPPORT=ON -D WITH_V4L=ON -D INSTALL_C_EXAMPLES=ON -D INSTALL_PYTHON_EXAMPLES=ON -D BUILD_EXAMPLES=ON -D WITH_QT=ON -D WITH_OPENGL=ON -D WITH_VTK=ON ..”
i just again receive the following answer:
-bash: make: command not found
Hello hamzeh,
You don’t have the required programs to compile it. Make sure that you install them first. This is done at the beginning of the tutorial.
Hi Keegan.Ren,
Sure, I can. Maybe in another post.
You can use Qt 5 as well with OpenCV.
So glad you published this. Sometimes I just want a hassle-free install, and this was truly the ticket.
Thank you very much mr samontab. it works very nice. I like to work with OpenCV and Ubuntu, I am a condidate Ph.D in Computer Vision
Glad to hear it worked for you mxer.
All the best, Assma.
Thanks man, you have been very helpful for along time, for varieties of opencv and ubuntu versions.
Cheers,
Thanks Girmaw!
hi. Thank you for your guide.
but i have some problem.
when I typed ‘make’
I found error…
In file included from /usr/include/qt4/QtOpenGL/QtOpenGL:5:0,
from /home/ubuntu/opencv-2.4.9/modules/highgui/src/window_QT.h:46,
from /home/ubuntu/opencv-2.4.9/modules/highgui/src/window_QT.cpp:47:
/usr/include/qt4/QtOpenGL/qgl.h:85:17: error: ‘GLdouble’ has a previous declaration as ‘typedef GLfloat GLdouble’
typedef GLfloat GLdouble;
^
In file included from /usr/include/GL/gl.h:2059:0,
from /usr/include/GL/glx.h:32,
from /home/ubuntu/opencv-2.4.9/modules/highgui/src/window_QT.cpp:59:
/usr/include/GL/glext.h:468:19: error: conflicting declaration ‘typedef std::ptrdiff_t GLsizeiptr’
typedef ptrdiff_t GLsizeiptr;
^
In file included from /usr/include/qt4/QtOpenGL/qgl.h:79:0,
from /usr/include/qt4/QtOpenGL/QtOpenGL:5,
from /home/ubuntu/opencv-2.4.9/modules/highgui/src/window_QT.h:46,
from /home/ubuntu/opencv-2.4.9/modules/highgui/src/window_QT.cpp:47:
/usr/include/GLES2/gl2.h:69:25: error: ‘GLsizeiptr’ has a previous declaration as ‘typedef khronos_ssize_t GLsizeiptr’
typedef khronos_ssize_t GLsizeiptr;
^
In file included from /usr/include/GL/gl.h:2059:0,
from /usr/include/GL/glx.h:32,
from /home/ubuntu/opencv-2.4.9/modules/highgui/src/window_QT.cpp:59:
/usr/include/GL/glext.h:469:19: error: conflicting declaration ‘typedef std::ptrdiff_t GLintptr’
typedef ptrdiff_t GLintptr;
^
In file included from /usr/include/qt4/QtOpenGL/qgl.h:79:0,
from /usr/include/qt4/QtOpenGL/QtOpenGL:5,
from /home/ubuntu/opencv-2.4.9/modules/highgui/src/window_QT.h:46,
from /home/ubuntu/opencv-2.4.9/modules/highgui/src/window_QT.cpp:47:
/usr/include/GLES2/gl2.h:70:26: error: ‘GLintptr’ has a previous declaration as ‘typedef khronos_intptr_t GLintptr’
typedef khronos_intptr_t GLintptr;
^
make[2]: *** [modules/highgui/CMakeFiles/opencv_highgui.dir/src/window_QT.cpp.o] Error 1
make[1]: *** [modules/highgui/CMakeFiles/opencv_highgui.dir/all] Error 2
make: *** [all] Error 2
can you help me??
Hi doo-sol Lee,
It seems that the system is not finding OpenGL.
Make sure that the cmake option for OpenGL is there (WITH_OPENGL=ON) and that you correctly installed all the dependencies at the beginning.
Also, make sure that you are using these specific versions: Ubuntu 14.04 LTS, and OpenCV 2.4.9. The guide should still work in other environments, but with those versions, it is copy paste ready :)
Hi, again me…
thank you for your reply.
I’m working on bealglebone Board.(based on ARM cortex-A8)
I istalled bone-ubuntu-14.04.1-console-armhf-2014-10-29-2gb.img on beaglebone board.
You said that I had to install Ubuntu LTS 14.04.
Then, your guide is unsuitable to me?
sorry for my poor English…
Hi doo-sol Lee,
That is a completely different environment. You can use the tutorial as a guide, but definitely it will not work just copy pasting it.
Some libraries that OpenCV requires may not be there in your repositories, and so on.
awesome tutorial man..
Thanks saurabh
Hi when i try to build my code I have this error message:
“OpenCV Error: Unspecified error (The function is not implemented. Rebuild the library with Windows, GTK+ 2.x or Carbon support. If you are on Ubuntu or Debian, install libgtk2.0-dev and pkg-config, then re-run cmake or configure script) in cvNamedWindow, file /hdd/buildbot/slaves/slave_jetson_tk1/52-O4T-L4T/opencv/modules/highgui/src/window.cpp, line 483
terminate called after throwing an instance of ‘cv::Exception’
what(): /hdd/buildbot/slaves/slave_jetson_tk1/52-O4T-L4T/opencv/modules/highgui/src/window.cpp:483: error: (-2) The function is not implemented. Rebuild the library with Windows, GTK+ 2.x or Carbon support. If you are on Ubuntu or Debian, install libgtk2.0-dev and pkg-config, then re-run cmake or configure script in function cvNamedWindow”
What is this? what can i do to solve it
Hi Armando,
It seems that you did not install any library for managing windows, which is needed by HighGUI.
Just re compile opencv by following this tutorial line by line, and it should work. Don’t skip any part of it.
Hi.. This helped me a lot,..Thank you so much.
We want to pull the data from facebook and using pulled data edit the sample video with facebook pictures and play in the browser. Sample video has placeholders which is moving . I have to track the placeholder’s position using openCV and have to replace it with facebook pictures.
Is it possible to use open CV with html5 and python? If you have any tutorial for that,Please share..
Thank you so much again..
hy, this is a great tutorial – many thanks.
Unfortunately i have the same troubles as Armando has (one post prior)
**************************
OpenCV Error: Unspecified error (The function is not implemented. Rebuild the library with Windows, GTK+ 2.x or Carbon support. If you are on Ubuntu or Debian, install libgtk2.0-dev and pkg-config, then re-run cmake or configure script) in cvNamedWindow, file /home/rene/Ubuntu_System/opencv-2.4.10/modules/highgui/src/window.cpp, line 483
terminate called after throwing an instance of ‘cv::Exception’
what(): /home/rene/Ubuntu_System/opencv-2.4.10/modules/highgui/src/window.cpp:483: error: (-2) The function is not implemented. Rebuild the library with Windows, GTK+ 2.x or Carbon support. If you are on Ubuntu or Debian, install libgtk2.0-dev and pkg-config, then re-run cmake or configure script in function cvNamedWindow
Aborted (core dumped)
********************
ARMANDO, do you have any ideas so far how to solve this?
Many thanks!!!
..its me again :-)
i tried the 2 cpp-examples and they worked fine.
So am i am right, if i assume that only namedWindow-commands will not work?
does this mean my opencv-installation is fine actually?
dows this mean i could work with programs, which do not require windows?
many thanks for your help!
The best guide for beginners …. Thanks for helping beginners like me. Keep doing good work.
Works with OpenCv 2.4.10 too. Just replace 2.4.9 to 2.4.10 while executing commands on terminal.
Tested in Ubuntu Gnome 14.04 and Xubuntu 14.04
Hi! I followed the tutorial and everything worked with no errors but I don’t have the java folder inside the build folder and I need it in order to work with eclipse.. Do you know why this happened?
Thanks!
Hi Javier,
Probably you did not include Java in the cmake step.
Thanks for that hotice.
You are welcome Rama Krishna Reddy
Hi Rene,
If you just copy and paste the instructions, it should work. At least using OpenCV 2.4.9 under Ubuntu 14.04 LTS. If you use any other distro or version of OpenCV, it should still work, but you should know what you are doing, and check every step.
The error that you are showing here is related to a GUI. Try the suggested solution (sudo apt-get install libgtk2.0-dev pkg-config) and then re run the tutorial.
Hi Rene,
It seems that the only error is GUI related, so you may use the library for the rest of the functionality. Although, I would not recommend using it because who knows what else is missing. Highgui is the module for GUI and also for I/O, so reading and writing images and video, and also reading from keyboard and mouse. I recommend you to install opencv properly first.
By the way, do you need to use the latest OpenCV?, otherwise just use the included pre compiled version from the application manager!
Hi KV,
Of course you can use OpenCV for that, but OpenCV will only deal with the image processing part, you should take care of the web interface.
Having said that, probably OpenCV is not the ideal candidate for that particular task. Maybe something like imagemagick would be easier to use in your case.
Hi! Thanks for the tutorial. I just got a problem.
All examples run great. But that from Qt_sample is giving error in OpenGL. I also run other examples that uses OpenGL and no problem appeared. I used CMake like you and added the flag WITH_OPENGL=ON and received a YES(that was reconized). Do you know what this problem can be? Sorry for the english. Ty
Hi Gabriel,
Hard to tell without the exact error.
I just got this:
after cmake ..
— The C compiler identification is GNU 4.8.2
— The CXX compiler identification is GNU 4.8.2
— Check for working C compiler: /usr/bin/cc
— Check for working C compiler: /usr/bin/cc — works
— Detecting C compiler ABI info
— Detecting C compiler ABI info – done
— Check for working CXX compiler: /usr/bin/c++
— Check for working CXX compiler: /usr/bin/c++ — works
— Detecting CXX compiler ABI info
— Detecting CXX compiler ABI info – done
— Looking for XOpenDisplay in /usr/lib/x86_64-linux-gnu/libX11.so;/usr/lib/x86_64-linux-gnu/libXext.so
— Looking for XOpenDisplay in /usr/lib/x86_64-linux-gnu/libX11.so;/usr/lib/x86_64-linux-gnu/libXext.so – found
— Looking for gethostbyname
— Looking for gethostbyname – found
— Looking for connect
— Looking for connect – found
— Looking for remove
— Looking for remove – found
— Looking for shmat
— Looking for shmat – found
— Looking for IceConnectionNumber in ICE
— Looking for IceConnectionNumber in ICE – found
— Found X11: /usr/lib/x86_64-linux-gnu/libX11.so
— Found OpenGL: /usr/lib/x86_64-linux-gnu/libGL.so
— Configuring done
— Generating done
— Build files have been written to: /home/gabriel-pc/Documentos/opencv-2.4.9/samples/cpp/Qt_sample/build
after ./ ..
OpenCV Error: No OpenGL support (Library was built without OpenGL support) in cvNamedWindow, file /home/gabriel-pc/Documentos/OpenCV/opencv/modules/highgui/src/window_gtk.cpp, line 845
terminate called after throwing an instance of ‘cv::Exception’
what(): /home/gabriel-pc/Documentos/OpenCV/opencv/modules/highgui/src/window_gtk.cpp:845: error: (-218) Library was built without OpenGL support in function cvNamedWindow
Abortado (imagem do núcleo gravada)
Hi Samon
You defintely did great job. You should be proud of it. I personally appreciate your work.
Thank you so much dear.
Majed
Your guide is on point. Keep it up!
Thanks for a great guide, very precise and the only one of many that actually worked for me ;)
Install libqt5opengl5-dev on ubuntu 14.04
Hi Dmitry,
You can still use Qt 4.8 on Ubuntu 14.04. Of course Qt5 can be used as well, but there are a few projects that still depend on the older Qt 4.8.
You are welcome Jonathan
Thanks PRIME
Thanks Majed
Hi Gabriel,
It seems that OpenGL is not being detected, or not being selected.
Thank you very much for your guide, it was very helpful. I have followed the instructions of many tutoriels but none works. You guide is perfect, thank you again.
You are welcome Roka. I’m glad it worked for you too.
Regarding the error about ‘-fPIC’, it seems that when configuring/building ffmpeg, you need to include ‘–enabled-shared’. This is mentioned in an older version of this guide: http://www.samontab.com/web/2011/06/installing-opencv-2-2-in-ubuntu-11-04/
Where the full configure command for ffmeg is:
./configure –enable-gpl –enable-version3 –enable-nonfree –enable-postproc –enable-libfaac –enable-libopencore-amrnb –enable-libopencore-amrwb –enable-libtheora –enable-libvorbis –enable-libxvid –enable-x11grab –enable-swscale –enable-shared
Thanks for the awesome tutorial!
Thanks a lot, it worked like a charm!
Thanks alot, this was really helpful
Hi Caleb,
I think you are right.
You are welcome Roberto
You are welcome Thomas
Hi, Sebastian I am just trying to learn OpenCV through your video course, however trying to install the 2.4.9 version. Everything worked well till I’ve tried to run the Facedetect example..it executes but at the end this sentence appears:
init done
opengl support available
In image read
Illegal instruction <—-THIS
And nothing happens. I've tried the contours, polar_transforms and they work..guessing I could say that the problem involves some type of raster managing function..please give me a hand
Atte.
Hensly
Hello Hensly,
Great to hear that you are using my videos. I hope they are useful for you.
About your specific issue, it seems that it is somehow related to reading an image from disk. Try using a webcam or a video file.
If that also does not work, try using a different model file (I am refering to the xml that represents the object).
Thank you su much samontab. It’s a great tutorial for beginners
The weath of examples provided with opencv are increadible, your guide provides the perfect jumpstart.
That was so helpful and so clear. Best tutorial to install openCV in ubuntu. Thanks a lot you are amazing..
Thanks Nabil!
Thanks for tutorial Mr. Sebastian Montabone
I’m try 2 again and now is success.
Hi Sebastian,
I almost couldn’t put to work opencv on ubuntu, finally it works now, but when I look what version is working, it shows version 2.4.8., it is strange because I dont have this folder anywhere, just 2.4.9.
How can I update my opencv installation, from 2.4.8 to 2.4.9, without to have problems it works again?.
Thanks in advance, Jaime
Hi Jaime,
Maybe you were trying to install it through the repositories. Make sure that you uninstall everything related to opencv (You can open the application manager to do it with a GUI), and then restart this guide, step by step, and it should work.
Hi Dimas Andriyanto S.,
Great to hear that it worked for you.
OpenCV modules are missing – contrib
Plz help me out as I am not able to get solution from any where.
root@praveen:/home/praveen/opencv/opencv/samples/cpp# make
[100%] Building CXX object CMakeFiles/facerec_demo.dir/facerec_demo.cpp.o
/home/praveen/opencv/opencv/samples/cpp/facerec_demo.cpp:20:31: fatal error: opencv2/contrib.hpp: No such file or directory
#include “opencv2/contrib.hpp”
^
compilation terminated.
make[2]: *** [CMakeFiles/facerec_demo.dir/facerec_demo.cpp.o] Error 1
make[1]: *** [CMakeFiles/facerec_demo.dir/all] Error 2
make: *** [all] Error 2
I have explored few option but not able to get direct way to add missing modules.
Yes, the contrib modules are not included as they are experimental. Here you can get the information on how to use them:
https://github.com/itseez/opencv_contrib
It is better to use them with OpenCV 3 by the way, which is also beta.
I get this while installing the dependencies :(
Reading package lists… Done
Building dependency tree
Reading state information… Done
Some packages could not be installed. This may mean that you have
requested an impossible situation or if you are using the unstable
distribution that some required packages have not yet been created
or been moved out of Incoming.
The following information may help to resolve the situation:
The following packages have unmet dependencies:
libcheese-gtk23 : Depends: libclutter-gtk-1.0-0 (>= 0.91.8) but it is not going to be installed
Depends: libcogl15 (>= 1.15.8) but it is not going to be installed
libcheese7 : Depends: libclutter-gst-2.0-0 (>= 0.10.0) but it is not going to be installed
Depends: gstreamer1.0-clutter but it is not going to be installed
libclutter-1.0-0 : Depends: libcogl-pango15 (>= 1.15.8) but it is not going to be installed
Depends: libcogl15 (>= 1.15.8) but it is not going to be installed
E: Error, pkgProblemResolver::Resolve generated breaks, this may be caused by held packages.
Hi Shashank,
This means that you have some dependencies issues. If you can, start with a freshly installed OS. If you can’t try removing the problematic packages.
Please give me your paypal data so I can transfer you my life. Million thanks for this documentation, why isn’t the whole web like this?
Hello,
All examples in the tuturial are working for me, but when I tried to compile the rest of the examples in viz directory, following the example, they don’t work, I know I have to import vtk, but I don’t know how to do it. Can you give me a makefile, or a sentence, to compile the example: /opencv-2.4.9/samples/cpp/tutorial_code/viz/creating_widgets.cpp.
And do you know how to include all necessary to run this example in QT Creator IDE? Or not this example but this: /home/paz/opencv-2.4.9/samples/cpp/Qt_sample/qt_opengl.cpp or other which uses Qt and at the same time VTK libraries.
Thank you so much!
Hi Paz,
For running the examples in Qt Creator, take a look at my post about the Edison, Qt Creator, and CMake.
You will learn how to use any CMake project in Qt Creator.
About the other viz examples not working, you are right. The viz module is meant to be used in OpenCV 3.0, so it is now fully supported in 2.4.9.
import cv2 is failling.
(same problem: http://stackoverflow.com/questions/19876079/opencv-cannot-find-module-cv2)
The workarround is
import sys
sys.path.append(‘/opt/ros/hydro/lib/python2.7/dist-packages’)
Thanks AntonisP… I assume this problem appeared in OpenCV 2.4.10, right?. I haven’t checked that solution yet though.
http://code.opencv.org/issues/3814
problem with cuda6.5.
Bug is fixed in newer version so, I updated the NCVPixelOperations.hpp file.
OK, thanks AntonisP!
<>
No in OpenCV 2.4.9. I followd the procedure as you have it.
I am installing OpenCV 2.4.9 on Ubuntu 14.04. When I install dependancies (using command sudo apt-get install build-essential ), it gives me an error saying some packages are not installed. The error is given below:
The following packages have unmet dependencies:
libcheese-gtk23 : Depends: libclutter-gtk-1.0-0 (>= 0.91.8) but it is not going to be installed
Depends: libcogl15 (>= 1.15.8) but it is not going to be installed
libcheese7 : Depends: libclutter-gst-2.0-0 (>= 0.10.0) but it is not going to be installed
Depends: gstreamer1.0-clutter but it is not going to be installed
libclutter-1.0-0 : Depends: libcogl-pango15 (>= 1.15.8) but it is not going to be installed
Depends: libcogl15 (>= 1.15.8) but it is not going to be installed
E: Error, pkgProblemResolver::Resolve generated breaks, this may be caused by held packages.
Kindly help with this matter.
I had some dependencies issues:
Reading package lists… Done
Building dependency tree
Reading state information… Done
Some packages could not be installed. This may mean that you have
requested an impossible situation or if you are using the unstable
distribution that some required packages have not yet been created
or been moved out of Incoming.
The following information may help to resolve the situation:
The following packages have unmet dependencies:
libcheese-gtk23 : Depends: libclutter-gtk-1.0-0 (>= 0.91.8) but it is not going to be installed
Depends: libcogl15 (>= 1.15.8) but it is not going to be installed
libcheese7 : Depends: libclutter-gst-2.0-0 (>= 0.10.0) but it is not going to be installed
Depends: gstreamer1.0-clutter but it is not going to be installed
libclutter-1.0-0 : Depends: libcogl-pango15 (>= 1.15.8) but it is not going to be installed
Depends: libcogl15 (>= 1.15.8) but it is not going to be installed
E: Error, pkgProblemResolver::Resolve generated breaks, this may be caused by held packages.
I’ve solved it by installing these dependencies:
sudo apt-get install libglew-dev libcheese7 libcheese-gtk23 libclutter-gst-2.0-0 libcogl15 libclutter-gtk-1.0-0 libclutter-1.0-0
Thanks a lot. Great tutorial, worked for me. Except that it I was unable to run the first example of the new c++ interface and the python, java, and open gl code. I have installed java jre-8 and python 2.7, but it still didin’t work. It says:
Traceback (most recent call last):
File “/home/arktheshadow/opencv-2.4.9/samples/python2/turing.py”, line 11, in
import cv2
ImportError: No module named cv2
I have little idea why this is happening. Could you please help me with this.
Thanks a lot. i could install opencv in ubuntu successfully. If anybody has problem to modify /etc/bash.bashrc then try following
$ echo “PKG_CONFIG_PATH=$PKG_CONFIG_PATH:/usr/local/lib/pkgconfig
export PKG_CONFIG_PATH /usr/local/lib” >> /etc/bash.bashrc
Thanks a lot for this awesome tutorial.
I have been trying to create finger detection code in python. Could you please help with the same?
During the execution of ”make ” command it does uptill 77% and then shows an error
[ 77%] Built target pch_Generate_opencv_contrib
[ 77%] Built target opencv_contrib
[ 77%] Built target opencv_test_contrib_pch_dephelp
[ 77%] Built target pch_Generate_opencv_test_contrib
[ 77%] Built target opencv_test_contrib
[ 77%] Built target opencv_java
/bin/sh: 1: cannot create /home/akash/opencv-2.4.10/build/modules/java/test/.build/ant-Release.properties: Permission denied
make[2]: *** [modules/java/test/CMakeFiles/opencv_test_java_properties] Error 2
make[1]: *** [modules/java/test/CMakeFiles/opencv_test_java_properties.dir/all] Error 2
make: *** [all] Error 2
I am installing opencv 2.4.10 on ubuntu 14.04
Hi Akash. There seems to be a problem with your permission for the Java bindings. Try disabling them, or correcting the permissions.
Aditi. It depends on the setup that you are using. Some things to consider: spectrum of the camera, lenses used, sensor size, min and max distance from hands to the camera, camera speed, 2D or 3D camera, etc…
Hi samontab!
Thanks a lot for your instructions. I hav been following your instructions to install OpenCV on ubuntu for almost 2.5 years now. Everytime I have an issue, I come back to your page.
Thanks once again for your efforts!
-crack.mech
Thank you from Argentina
Thanks!, interesting email :)
Thanks crack.mech. You definitely take your time to read the instructions :)
Thank youuuuu :D
You are welcome enami
thanks you sir.Your guide was my only hope of getting opencv installed.it worked.my project was entirely based on opencv.so if it did’t work,i would have been in trouble.
thanks for the help.
if possible i have an error in scilab.can you help to resolve it.
thanks.
You are welcome sandeep. Good to hear that it worked for you.
sir,
i have a problem in scilab.while trying to install sivp in scilab in unbuntu 14.04 it get an error :
SIVP – Scilab Image and Video Processing Toolbox
Load macros
Load gateways
atomsLoad: An error occurred while loading ‘SIVP-0.5.3.1-2’:
link: The shared archive was not loaded: libtiff.so.4: cannot open shared object file: No such file or directory
!–error 10000
at line 335 of function atomsLoad called by :
atomsLoad SIVP
can you help me resolve this.it would be of great help.
thanks
Just install scilab with this:
sudo apt-get install scilabAnd it should be fine.
Also, this may be useful:
http://stackoverflow.com/questions/23380652/scilab-sivp-atomsload-error
Hi.
I have a questin. Howi can compile and run my own programs?
Ty
Thank you!
Hi Josue, if you have your program in hello.cpp, just run this:
g++ `pkg-config --cflags opencv` -o hello hello.cpp `pkg-config --libs opencv`Then, you can run it like this:
./helloHi Samontab,
After installing opencv, how we can link python to opencv because i need to write the code in python.Please give the instruction to solve the above problem.
Thank you.
Hi Nagaraj,
If you follow the instructions on this guide, you should end up with a Python enabled installation of Opencv. Just run the included python samples!
Linking CXX shared library ../../lib/libopencv_highgui.so
/usr/bin/ld: /usr/local/lib/libavformat.a(rmsipr.o): relocation R_X86_64_32 against `.rodata’ can not be used when making a shared object; recompile with -fPIC
had this error
/usr/local/lib/libavformat.a: error adding symbols: Bad value
collect2: error: ld returned 1 exit status
make[2]: *** [lib/libopencv_highgui.so.2.4.9] Error 1
make[1]: *** [modules/highgui/CMakeFiles/opencv_highgui.dir/all] Error 2
make: *** [all] Error 2
Hi Keer,
It seems that you are mixing static and shared libraries in your compilation. Make sure everything is static or everything is shared.
Hi Sebastian,
thanks for the tutorial. It made my life easier.
Do you have any similar tutorial on installing opencv 3.0 beta in ubuntu 14.04 lts (with python enabled)? Thanks in advance.
Hi,
finally i re install ubuntu 14.04 and follow this method for opencv 2.4.10 it worked perfectly
Thank you very very much samontab.
Hi Vijay,
The process should be very similar…
Great to hear that it worked for you keer
Is texlive-latex-extra really necessary? It is huge.
Hi drvit,
That package is only necessary for building the documentation, so it is not essential.
Hello and thanks for the helping tutorial samontab. I already followed your step and it done. But my project need BackgroundSubtractorGMG library. I have checked in OpenCV 2.4.9 and theres no the name of that. What must I do? for your help thank you.
Hi Wisnu,
BackgroundSubtractorGMG is implemented in OpenCV 3.0. You can download and compile that version using this tutorial, but keep in mind that it is still in beta and some 2.x code will not compile with it.
Hi Samon,
I installed open-cv per your documentation above. First, thank you for putting this up. My installation is on ubuntu 14.04. The issue I have is that I keep getting this error:
This application failed to start because it could not find or load the Qt platform plugin “xcb”.
Reinstalling the application may fix this problem.
Aborted (core dumped)
I have tried running ldd on /usr/lib/x86_64-linux-gnu/qt5/plugins/platforms/libqxcb.so and it looks like nothing is missing. I also tried reinstalling and a bunch of other things. Any ideas on how to fix this?
Hi Rajiv,
Well, it seems to be related to Qt5. You could try with Qt4.
If you want to use Qt5, there seems to be a lot of information on how to solve the xcb problem on other forums.
Hi Samon,
I tried the installation with qt4 and that for some reason gave me a similar error. It turns out that setting the following variable fixed the issue for me:
export QT_QPA_PLATFORM_PLUGIN_PATH=path/to/plugins
Thanks for your help.
Rajiv
Hi Sebastian,
I accidentally addressed you as samon – based on the website url. I apologize for the oversight. Thanks for sharing all this information again.
Rajiv
No worries Rajiv!
Good to hear that Rajiv!
hello samontab, I am done installing your tutorial, hey thanks! I want to ask you a question, what opencv version that have BackgroundSubtractorGMG library? because I run my code in this version it cannot run, how can I upgrade to that version? for your help thank you.
Hi Wisnu,
That functionality is available in OpenCV 3, which will soon be released (Now it is at Release Candidate stage).
You can install it following my tutorial, it should mostly be the same.
thank you for the reply samontab, Ok I will search for opencv 3.x.x version. Do I need to uninstall the package of opencv 2.4.9, or I just upgrade it? sorry if I ask you a whole of question. I am still a newbie. I used opencv and python binding for my project.
anyway thank you for the help samontab.
It will be better to uninstall OpenCV 2 since there may be some inconsistencies with OpenCV 3.
You will need to remove all the files that got copied with sudo apt-get install, so you may want to re do that step to get a log of what happened, and remove all of those files.
Ok, thanks for the suggest samontab :-). I will practice the uninstalling step in http://askubuntu.com/questions/564290/how-to-uninstall-opencv-2-4-9-completely-from-ubuntu-14-04
hey thank you again.
hello samontab, I already installed and build OpenCV 3.0 RC1. I got that opencv in the opencv.org, but when I run my code it has an error that request a module of BacgroundSubtractorGMG. What do I go wrong? is there missing?
Thank you for the help.
You will have to be more precise than that. How did you install it?, how are you compiling your project?, what is the error message?, etc…
I apply the OpenCV in python 2.7. I re do again your tutorial step but I change in the step
wget http://sourceforge.net/projects/opencvlibrary/files/opencv-unix/2.4.9/opencv-2.4.9.zip
and replace it like this:
wget https://github.com/Itseez/opencv/archive/3.0.0-rc1.zip
my installation work and I do to run the samples in that opencv folder, like facedetect.py and it is work.
then I compiled my project, the message error is
SMOG = cv2.createBackgroundSubtractorGMG(frame, None, 0.01)
AttributeError: ‘module’ object has no attribute ‘createBackgroundSubtractorGMG’
sorry if it is still not clear. Thank you for the reply samontab.
Hi,
I’m trying to build OpenCV v3.0.0-rc1 on Ubuntu 14.10.
However, I receive the following regarding VTK when I do qmake:
FIRST MENTION:
— The imported target “vtk” references the file
“/usr/bin/vtk”
but this file does not exist. Possible reasons include:
* The file was deleted, renamed, or moved to another location.
* An install or uninstall procedure did not complete successfully.
* The installation package was faulty and contained
“/usr/lib/cmake/vtk-6.1/VTKTargets.cmake”
but not all the files it references.
— VTK support is disabled. Incompatible combination: OpenCV + Qt5 and VTK ver.6.1.0 + Qt4
SECOND MENTION:
— GUI:
— QT 5.x: YES (ver 5.3.0)
— QT OpenGL support: YES (Qt5::OpenGL 5.3.0)
— OpenGL support: YES (/usr/lib/x86_64-linux-gnu/libGLU.so /usr/lib/x86_64-linux-gnu/libGL.so /usr/lib/x86_64-linux-gnu/libSM.so /usr/lib/x86_64-linux-gnu/libICE.so /usr/lib/x86_64-linux-gnu/libX11.so /usr/lib/x86_64-linux-gnu/libXext.so)
— VTK support: NO
THIRD MENTION:
— Configuring done
— Generating done
CMake Warning:
Manually-specified variables were not used by the project:
FORCE_VTK
———————————————-
Second question:
your sudo apt-get command says to install: libvtk5-dev.
I however have already libvtk6-dev installed. I assume this is enough? (When I try to install libvtk5-dev it says it will REMOVE libvtk6-dev so I assume I have to stay with libvtk6-dev ?)
KR,
Asgaro
Hi Asgaro,
First things first. You are using a new version of OpenCV. The change from 2.x to 3.x is a major change, therefore some includes, and other things will need to be changed accordingly.
Also, you are using Ubuntu 14.10, which is neither the latest one(15.04), or a LTS. I recommend you using 14.04LTS if you are going to be working on this project seriously as some dependencies may break the compilation.
About VTK, and Qt. Do you really need them?, if not, just not use them, and it will compile fine. If you do need them, then you need to choose which versions you want to use.
VTK 6 is a major change again from VTK 5. There is a lot of software that still relies on VTK 5, and is not compatible out of the box with VTK 6. The same with Qt. The change from 4 to 5 is important, and many libraries or applications still use version 4.
Having said that, you can still use Qt5 and VTK6 in your program. You just need to know what you are doing. If you don’t know what you are doing, then, just copy and paste all the steps in this tutorial in a Ubuntu 14.04 LTS machine and it will work. You can even replace OpenCV 2.4.9 with the latest (2.4.11 at this time), and it should also work.
Is text detection is possible in opencv 2.4.9….pls help me my project is text detection in natural scenes.Can you help me to find cpp code for this pls…
Thanks my friend! great tutorial!! grettings from Perú! You are welcome in this country :)
Excelente tutorial muchas gracias …..!!!!!!!!
Pd, do you have —> OpenCV on ROS
Hi Annmaria, Tesseract is a good library for text detection. OpenCV 3 provides an interface to it.
You are welcome Eliaz
Thanks Jovanny,
OpenCV is very tightly integrated with ROS so it should be straightforward to use it there…
Hi
Can i install opencv 3 in my system .I already installed opencv 2.4.9
Sure Annmaria, but it would be a good idea to have only OpenCV 2 or OpenCV 3 installed system wide.
You can always just build OpenCV and not install it system-wide, so you can have different versions in your system.
This tutorial’s really great! I’ve been struggling with installation for couple days, but this tutorial helped a lot
Hi Samontab,
Thanks for the post! I got through it all right but when I go ahead and try use the videoio package for capturing from my web cam, I get VIDEOIO ERROR: V4L/V4L2: VIDIOC_S_CROP. This comes up after I open a VideoCapture stream.
Then I also get the following message when I try to do imshow (this time I think it’s the highgui package)…
OpenCV Error: Unspecified error (The function is not implemented. Rebuild the library with Windows, GTK+ 2.x or Carbon support. If you are on Ubuntu or Debian, install libgtk2.0-dev and pkg-config, then re-run cmake or configure script) in cvNamedWindow, file /home/ahsueh1996/Documents/opencv/modules/highgui/src/window.cpp, line 516
terminate called after throwing an instance of ‘cv::Exception’
what(): /home/ahsueh1996/Documents/opencv/modules/highgui/src/window.cpp:516: error: (-2) The function is not implemented. Rebuild the library with Windows, GTK+ 2.x or Carbon support. If you are on Ubuntu or Debian, install libgtk2.0-dev and pkg-config, then re-run cmake or configure script in function cvNamedWindow
I have installed opencv once before using your tutorial and am using it on Ubuntu 14.04 with C++ Ecllipse IDE. Thanks for your help in advance!
Albert
Hi Albert,
It seems that you don’t have installed gtk. Do a sudo apt-get install libgtk2.0-dev, and re build the library.
Video input can be tricky.
Thanks Samontab! I’ve tried getting the libgtk2.0-dev and I rebuilt opencv with your instructions… I’ll give it another shot though :)
You’re welcome Albert.
i need to install opencv 3.0 plzzz help
i hv ubuntu 14.04,, 32bit system
The procedure is practically the same as this tutorial.
Thanks so much!
You’re welcome Mo
i am having trouble with opencv_contrib modules, how do i include those
actually i want to use sift and i am new to opencv
Hi saisha,
To build opencv_contrib modules, just follow the official instructions:
https://github.com/itseez/opencv_contrib
Note that these are a separate set of modules that contain experimental and/or less tested code.
Hello saisha,
SIFT is included in OpenCV 2 distribution under the non free module because it is a patented algorithm.
To use nonfree components, you need to explicitly activate it (given that you have a license to use it).
thanks, what abt installing akaze
OpenCV Error: Unspecified error (The function is not implemented. Rebuild the library with Windows, GTK+ 2.x or Carbon support. If you are on Ubuntu or Debian, install libgtk2.0-dev and pkg-config, then re-run cmake or configure script) in cvNamedWindow, file /tmp/buildd/ros-jade-opencv3-2.9.6-0vivid-20150512-2146/modules/highgui/src/window.cpp, line 516
terminate called after throwing an instance of ‘cv::Exception’
what(): /tmp/buildd/ros-jade-opencv3-2.9.6-0vivid-20150512-2146/modules/highgui/src/window.cpp:516: error: (-2) The function is not implemented. Rebuild the library with Windows, GTK+ 2.x or Carbon support. If you are on Ubuntu or Debian, install libgtk2.0-dev and pkg-config, then re-run cmake or configure script in function cvNamedWindow
I have opencv with ROS and didn’t follow the above installation instructions. Can I use opencv without the ROS cv_bridge? Or do I always have to integrate it with ROS and then use it?
Thank You man
Thanks saisha,
I think akaze features are available in OpenCV 3.
Hi Himanshi,
Yes, you can use opencv without ROS. Just follow this tutorial, or if you don’t need a specific version, just install it from the repositories!
You are welcome Devavrat!
Hi Samontab,
Great tutorial. Thanks. I could install and build examples and run them. But when I tried to write my sample code just to read and display an image, I get the following error message. Can you please help me with what could be the problem?
/usr/bin/ld: /tmp/ccefRSsy.o: undefined reference to symbol ‘_ZNSaIcED1Ev@@GLIBCXX_3.4’
//usr/lib/x86_64-linux-gnu/libstdc++.so.6: error adding symbols: DSO missing from command line
collect2: error: ld returned 1 exit status
Thanks in advance!
Hello New,
Try compiling your code with this command:
g++ `pkg-config --cflags opencv` -o executable main.cpp `pkg-config --libs opencv`hye. i am new to this stuff (3days learning)
i can run all your examples but now i want to run the face detect.
where the program need to use the webcam. i don’t know how to run it.
can you help me with the program facedetect from the samples?
Hi nobeyanesa,
You could just combine an example that reads from the camera, like lkdemo.cpp, with an example that detects faces, like facedetect.cpp. This should be straightforward.
Thank you so much!
You’re welcome Owen.
thank you so much for the guide and video tutorials, bro
You’re welcome RobHaii
First of all thank you . Ur tutorial really helped .
I successfully executed above steps . Even the examples of face recognition you have given works fine on command line .
But when i run it on my python shell ,
import cv2
it gives an error that no module ‘cv2’ exists .
Please help me out here man .
Thanks Ankit Bindal,
First of all, make sure that you followed all the steps correctly.
Also, make sure that you are using python2, and not python3.
After a correct installation you should have a cv2.so file here: /usr/local/lib/python2.7/dist-packages.
If you still have this issue, it may be a problem with the paths.
Try the following in python:
import syssys.path.append('/usr/local/lib/python2.7/dist-packages')
import cv2
Hi,
I am facing issues with running application written using Openframeworks and OpenCV. They execute well on Debian Weezy with Gnome but if I try to run the same application from a windowmanager like FluxBox I don’t get a UI (no errors appear on the console). Have you faced any similar issues. Any help is welcome, have been struggling with this issue for quite sometime now. If I do not use OpenFrameworks and use only C++ and OpenCV the apps work on FluxBox.
Is it that FluxBox has issues running OpenGL apps.
Thanks for your help and this great tutorial.
Cheers,
YD
When running the command unzip opencv-2.4.9.zip, it says Archive: opencv-2.4.9.zip
End-of-central-directory signature not found. Either this file is not
a zipfile, or it constitutes one disk of a multi-part archive. In the
latter case the central directory and zipfile comment will be found on
the last disk(s) of this archive.
unzip: cannot find zipfile directory in one of opencv-2.4.9.zip or
opencv-2.4.9.zip.zip, and cannot find opencv-2.4.9.zip.ZIP, period.
What am I supposed to do?
Hi Debottam Kundu,
Try downloading the zip file again. Probably it is just corrupt or it didn’t download entirely.
Hi YD,
Based on your description it seems to be a FluxBox configuration problem. You will have more luck asking in their forums.
Thank you for this great tutorial!
Please do you have any C++ and Opencv code about 3D Scene Flow?
Thank you in advanced!
great work dude!!!
Please how can i set opencv to work with QT creator
i didn’t run cmake with QT flag on when installing opencv
thanks
Hi janan,
If you are talking about just the Qt Creator IDE, just setup your project as a CMake(or qmake) project and open it with the IDE (Qt Creator).
If you are talking about using the built-in Qt GUI in OpenCV, you need to set the correct flags and re compile OpenCV with Qt support.
If you are talking about using Qt and OpenCV in your project independently, you can just link both libraries.
I followed the steps however, the python examples are not working. All the others are. I have anaconda installed, and I am getting the ImportError : No module named cv error.
Hi Darshan,
You either missed a step, or are using different versions.
Woks like a cham.
Thks dude.
Thanks for this guide! It’s really helped me!
Thanks for the great tutorial.
Post the opencv 3.0 alpha installation on Ubuntu 14.04 LTS on an Amazon instance, i run a opencv program to display an image. I get the following error:
No protocol specified
: cannot connect to X server :0.0
————-
I installed ubuntu-desktop
sudo apt-get install –no-install-recommends ubuntu-desktop
but the error continues.
Any help here would be great..
-Rashmi
You’re welcome Dmitriy. I’m glad it worked for you.
You’re welcome Mahall
Hi Rashmi,
Are you running a server version of Ubuntu?, if that’s the case, you will not have X by default.
This is not an OpenCV problem, basically you are trying to display something on a server that does not have a graphical display.
After you installed ubuntu-desktop, you should have an X server though. Can you log into a graphical display?
Make sure that you restart the X server. Easiest way would be to just restart the machine.
If it is not a local machine, you can ssh there with X forwarding. For example ssh -X username@server.com, or if you are in windows, just use xming and putty.
Hello Samon,
I’ve installed the ubuntu 14.04 LTS server in an amazon cloud instance.
Post the ubuntu-desktop installation, i open a ssh console to the cloud instance ( on my windows laptop)
Here the DISPLAY is not set. I set it “export DISPLAY=:0.0”, but the issue continues.
I now understand that this is not a opencv issue.
But any help to resolve the issue would be great. I’m now facing this issue since 3 days.
Thank you so much.
Well, if you have an X server running, you could connect to it on Windows using xming and Putty
Xming solved the issue.
I also tried the following:
– Uninstalled the ubuntu-desktop.
– In the putty session, enabled the “X11 forwarding”.
– Installed Xming and Xming-Fonts.
With the above setup, i’m able to view images. It seems Ubuntu-desktop is not needed.
Thank you for all your help here.
————————–
Now i’ve another issue:
1) When i run a video using opencv 3.0 alpha on the ubuntu 14.04 LTS server amazon instance ( using a putty for a ssh session ), i get the following error:
ubuntu@ip-172-31-19-159:~/opencv_test$ ./showVid
libdc1394 error: Failed to initialize libdc1394
Any suggestions here would be great. Thank you so much.
Hi Rashmi,
Good to hear that it is working for you.
The other error refers to a video capture library. If you search for it, you get some solutions like these:
http://stackoverflow.com/questions/12689304/ctypes-error-libdc1394-error-failed-to-initialize-libdc1394
Thanks a lot..Really nice job…
Thanks Alisha!
Great Tutorial :)
Thanks Astha!
Hi, I am from china,and I met this error when the command “make” is working .please send the answer to my email :759091957@qq.com
[ 58%] Building CXX object
modules/nonfree/CMakeFiles/opencv_perf_nonfree.dir/perf/perf_main.cpp.o
In file included from /home/exbot/Downloads/opencv/opencv-2.4.9/modules/nonfree/perf/perf_main.cpp:28:0:
/home/exbot/Downloads/opencv/opencv-2.4.9/modules/ocl/include/opencv2/ocl/private/opencl_dumpinfo.hpp: In function ‘void dumpOpenCLDevice()’:
/home/exbot/Downloads/opencv/opencv-2.4.9/modules/ocl/include/opencv2/ocl/private/opencl_dumpinfo.hpp:88:9: error: ‘PlatformsInfo’ is not a member of ‘cv::ocl’
/home/exbot/Downloads/opencv/opencv-2.4.9/modules/ocl/include/opencv2/ocl/private/opencl_dumpinfo.hpp:88:32: error: expected ‘;’ before ‘platforms’
/home/exbot/Downloads/opencv/opencv-2.4.9/modules/ocl/include/opencv2/ocl/private/opencl_dumpinfo.hpp:89:9: error: ‘getOpenCLPlatforms’ is not a member of ‘cv::ocl’
/home/exbot/Downloads/opencv/opencv-2.4.9/modules/ocl/include/opencv2/ocl/private/opencl_dumpinfo.hpp:89:37: error: ‘platforms’ was not declared in this scope
/home/exbot/Downloads/opencv/opencv-2.4.9/modules/ocl/include/opencv2/ocl/private/opencl_dumpinfo.hpp:95:19: error: ‘DevicesInfo’ in namespace ‘cv::ocl’ does not name a type
/home/exbot/Downloads/opencv/opencv-2.4.9/modules/ocl/include/opencv2/ocl/private/opencl_dumpinfo.hpp:96:39: error: ‘devices’ was not declared in this scope
/home/exbot/Downloads/opencv/opencv-2.4.9/modules/ocl/include/opencv2/ocl/private/opencl_dumpinfo.hpp:98:23: error: ‘DeviceInfo’ in namespace ‘cv::ocl’ does not name a type
/home/exbot/Downloads/opencv/opencv-2.4.9/modules/ocl/include/opencv2/ocl/private/opencl_dumpinfo.hpp:99:33: error: ‘current_device’ was not declared in this scope
/home/exbot/Downloads/opencv/opencv-2.4.9/modules/ocl/include/opencv2/ocl/private/opencl_dumpinfo.hpp:99:62: error: ‘CVCL_DEVICE_TYPE_CPU’ was not declared in this scope
/home/exbot/Downloads/opencv/opencv-2.4.9/modules/ocl/include/opencv2/ocl/private/opencl_dumpinfo.hpp:100:71: error: ‘CVCL_DEVICE_TYPE_GPU’ was not declared in this scope
In file included from /home/exbot/Downloads/opencv/opencv-2.4.9/modules/nonfree/perf/perf_main.cpp:28:0:
/home/exbot/Downloads/opencv/opencv-2.4.9/modules/ocl/include/opencv2/ocl/private/opencl_dumpinfo.hpp:108:15: error: ‘DeviceInfo’ in namespace ‘cv::ocl’ does not name a type
/home/exbot/Downloads/opencv/opencv-2.4.9/modules/ocl/include/opencv2/ocl/private/opencl_dumpinfo.hpp:110:9: error: ‘deviceInfo’ was not declared in this scope
/home/exbot/Downloads/opencv/opencv-2.4.9/modules/ocl/include/opencv2/ocl/private/opencl_dumpinfo.hpp:111:9: error: ‘deviceInfo’ was not declared in this scope
/home/exbot/Downloads/opencv/opencv-2.4.9/modules/ocl/include/opencv2/ocl/private/opencl_dumpinfo.hpp:113:25: error: ‘deviceInfo’ was not declared in this scope
/home/exbot/Downloads/opencv/opencv-2.4.9/modules/ocl/include/opencv2/ocl/private/opencl_dumpinfo.hpp:113:50: error: ‘CVCL_DEVICE_TYPE_CPU’ was not declared in this scope
/home/exbot/Downloads/opencv/opencv-2.4.9/modules/ocl/include/opencv2/ocl/private/opencl_dumpinfo.hpp:114:61: error: ‘CVCL_DEVICE_TYPE_GPU’ was not declared in this scope
make[2]: *** [modules/nonfree/CMakeFiles/opencv_perf_nonfree.dir/perf/perf_main.cpp.o] Error 1
make[1]: *** [modules/nonfree/CMakeFiles/opencv_perf_nonfree.dir/all] Error 2
make: *** [all] Error 2
exbot@ubuntu:~/Downloads/opencv/opencv-2.4.9/build$ ccmake
The program ‘ccmake’ is currently not installed. You can install it by typing:
sudo apt-get install cmake-curses-gui
exbot@ubuntu:~/Downloads/opencv/opencv-2.4.9/build$
Hi
I followed all the steps mentioned but I changed 2.4.9 to 3.0.0 and when I tried to run python example code I getting this error
ashwin@ashwin-Satellite-C50D-A:~$ python ~/opencv-3.0.0/samples/python2/turing.py
Traceback (most recent call last):
File “/home/ashwin/opencv-3.0.0/samples/python2/turing.py”, line 11, in
import cv2
ImportError: No module named cv2
Hi
I followed all the steps mentioned but “during” command execution i am getting these errors
Linking CXX executable ../../bin/opencv_perf_imgproc
../../lib/libopencv_highgui.so.2.4.9: undefined reference to `TIFFIsTiled@LIBTIFF_4.0′
../../lib/libopencv_highgui.so.2.4.9: undefined reference to `TIFFOpen@LIBTIFF_4.0′
../../lib/libopencv_highgui.so.2.4.9: undefined reference to `TIFFReadEncodedStrip@LIBTIFF_4.0′
../../lib/libopencv_highgui.so.2.4.9: undefined reference to `TIFFSetField@LIBTIFF_4.0′
../../lib/libopencv_highgui.so.2.4.9: undefined reference to `TIFFWriteScanline@LIBTIFF_4.0′
../../lib/libopencv_highgui.so.2.4.9: undefined reference to `TIFFGetField@LIBTIFF_4.0′
../../lib/libopencv_highgui.so.2.4.9: undefined reference to `TIFFScanlineSize@LIBTIFF_4.0′
../../lib/libopencv_highgui.so.2.4.9: undefined reference to `TIFFSetWarningHandler@LIBTIFF_4.0′
../../lib/libopencv_highgui.so.2.4.9: undefined reference to `TIFFSetErrorHandler@LIBTIFF_4.0′
../../lib/libopencv_highgui.so.2.4.9: undefined reference to `TIFFReadEncodedTile@LIBTIFF_4.0′
../../lib/libopencv_highgui.so.2.4.9: undefined reference to `TIFFReadRGBATile@LIBTIFF_4.0′
../../lib/libopencv_highgui.so.2.4.9: undefined reference to `TIFFClose@LIBTIFF_4.0′
../../lib/libopencv_highgui.so.2.4.9: undefined reference to `TIFFRGBAImageOK@LIBTIFF_4.0′
../../lib/libopencv_highgui.so.2.4.9: undefined reference to `TIFFReadRGBAStrip@LIBTIFF_4.0′
collect2: error: ld returned 1 exit status
make[2]: *** [bin/opencv_perf_imgproc] Error 1
make[1]: *** [modules/imgproc/CMakeFiles/opencv_perf_imgproc.dir/all] Error 2
make: *** [all] Error 2
ashwin@ashwin-Satellite-C50D-A:~/opencv-2.4.9/build$ make
[ 0%] Built target opencv_core_pch_dephelp
[ 0%] Built target pch_Generate_opencv_core
[ 0%] Built target opencv_core
[ 0%] Built target opencv_ts_pch_dephelp
[ 0%] Built target pch_Generate_opencv_ts
[ 0%] Built target opencv_flann_pch_dephelp
[ 0%] Built target pch_Generate_opencv_flann
[ 0%] Built target opencv_flann
[ 0%] Built target opencv_imgproc_pch_dephelp
[ 0%] Built target pch_Generate_opencv_imgproc
[ 3%] Built target opencv_imgproc
[ 3%] Built target opencv_features2d_pch_dephelp
[ 3%] Built target pch_Generate_opencv_features2d
[ 3%] Built target opencv_highgui_pch_dephelp
[ 3%] Built target pch_Generate_opencv_highgui
[ 6%] Built target opencv_highgui
[ 9%] Built target opencv_features2d
[ 9%] Built target opencv_ts
[ 9%] Built target opencv_perf_core_pch_dephelp
[ 12%] Built target pch_Generate_opencv_perf_core
[ 16%] Built target opencv_perf_core
[ 16%] Built target opencv_test_core_pch_dephelp
[ 16%] Built target pch_Generate_opencv_test_core
[ 16%] Built target opencv_test_core
[ 16%] Built target opencv_test_flann_pch_dephelp
[ 16%] Built target pch_Generate_opencv_test_flann
[ 16%] Built target opencv_test_flann
[ 16%] Built target opencv_perf_imgproc_pch_dephelp
[ 16%] Built target pch_Generate_opencv_perf_imgproc
Linking CXX executable ../../bin/opencv_perf_imgproc
../../lib/libopencv_highgui.so.2.4.9: undefined reference to `TIFFIsTiled@LIBTIFF_4.0′
../../lib/libopencv_highgui.so.2.4.9: undefined reference to `TIFFOpen@LIBTIFF_4.0′
../../lib/libopencv_highgui.so.2.4.9: undefined reference to `TIFFReadEncodedStrip@LIBTIFF_4.0′
../../lib/libopencv_highgui.so.2.4.9: undefined reference to `TIFFSetField@LIBTIFF_4.0′
../../lib/libopencv_highgui.so.2.4.9: undefined reference to `TIFFWriteScanline@LIBTIFF_4.0′
../../lib/libopencv_highgui.so.2.4.9: undefined reference to `TIFFGetField@LIBTIFF_4.0′
../../lib/libopencv_highgui.so.2.4.9: undefined reference to `TIFFScanlineSize@LIBTIFF_4.0′
../../lib/libopencv_highgui.so.2.4.9: undefined reference to `TIFFSetWarningHandler@LIBTIFF_4.0′
../../lib/libopencv_highgui.so.2.4.9: undefined reference to `TIFFSetErrorHandler@LIBTIFF_4.0′
../../lib/libopencv_highgui.so.2.4.9: undefined reference to `TIFFReadEncodedTile@LIBTIFF_4.0′
../../lib/libopencv_highgui.so.2.4.9: undefined reference to `TIFFReadRGBATile@LIBTIFF_4.0′
../../lib/libopencv_highgui.so.2.4.9: undefined reference to `TIFFClose@LIBTIFF_4.0′
../../lib/libopencv_highgui.so.2.4.9: undefined reference to `TIFFRGBAImageOK@LIBTIFF_4.0′
../../lib/libopencv_highgui.so.2.4.9: undefined reference to `TIFFReadRGBAStrip@LIBTIFF_4.0′
collect2: error: ld returned 1 exit status
make[2]: *** [bin/opencv_perf_imgproc] Error 1
make[1]: *** [modules/imgproc/CMakeFiles/opencv_perf_imgproc.dir/all] Error 2
make: *** [all] Error 2
when I tried to install 3.0.0 I dint have this problem but I could not execute any examples
Very good and helpful. Thanks a lot for the sharing!
All went well, thanks very much, now i can start playing with opencv, great job Sebastian!!
Happy New Year 2016!!
You’re welcome Andres. Happy new year!
hey sebastian. Great guide for installing opencv. Thank you for your instructions. I would be grateful if you could clarify 1 doubt of mine. I wanted to know if I could use the same guide to install opencv on my BeagleBone Black. It runs ubuntu 14.04LTS. Thanks again
Hi, thank you for this tutorial!
I just test this on Ubuntu 15.10 and works great.
I only need to change this lib:
“libtiff4-dev” update to “libtiff5-dev”
Thanks Luiz,
Good to know that it works in 15.10 as well.
make[2]: *** No rule to make target `/usr/lib/libz.so’, needed by `lib/libopencv_core.so.2.4.9′. Stop.
make[1]: *** [modules/core/CMakeFiles/opencv_core.dir/all] Error 2
make: *** [all] Error 2
vasista, it seems that you don’t have libz installed. Maybe you missed a step, or are using a different version of the OS or OpenCV.
Thanks for the tutorial. Others did not work for me. Successfully installed V 3.1.0 with Python bindings.
Hello,
when trying to build the source i get this error:
Linking CXX executable ../../bin/opencv_perf_core
/home/cgvg/anaconda2/lib/libpng16.so.16: undefined reference to `inflateReset2@ZLIB_1.2.3.4′
do you know how to fix it?
Hi Samontab,
I was trying to build java sample using ant and it hit this error:
clean:
compile:
[mkdir] Created dir: /home/opencv-2.4.9/samples/java/ant/build/classes
[javac] Compiling 1 source file to /home/opencv-2.4.9/samples/java/ant/build/classes
[javac] /home/opencv-2.4.9/samples/java/ant/src/SimpleSample.java:1: error: package org.opencv.core does not exist
[javac] import org.opencv.core.Core;
[javac] ^
[javac] /home/opencv-2.4.9/samples/java/ant/src/SimpleSample.java:2: error: package org.opencv.core does not exist
[javac] import org.opencv.core.Mat;
[javac] ^
When i was running make:
It shows error:
/usr/local/lib/libpython2.7.a: error adding symbols: Bad value
collect2: error: ld returned 1 exit status
make[2]: *** [lib/cv2.so] Error 1
make[1]: *** [modules/python/CMakeFiles/opencv_python.dir/all] Error 2
make: *** [all] Error 2
any idea how to solve???
Thanks
Hi Sebastian, I downloaded opencv 2.4.11 instead from github and followed all other steps accordingly. Python files don’t work. I get an ImportError saying no module named cv2
Hi abhishek.
Maybe they changed how Python bindings work in that release. Search for the correct python files and copy them accordingly.
Thank you very much. I had faced so much of problems while installing opencv. The tutorial is simple and perfect. great work.
gaurav@gaurav:~/opencv-3.1.0/build$ cmake -DWITH_QT=ON -DWITH_OPENGL=ON -DFORCE_VTK=ON -DWITH_TBB=ON -DWITH_GDAL=ON -DWITH_XINE=ON -DBUILD_EXAMPLES=ON ..
— Detected version of GNU GCC: 48 (408)
— Found ZLIB: /usr/lib/x86_64-linux-gnu/libz.so (found suitable version “1.2.8”, minimum required is “1.2.3”)
— Found ZLIB: /usr/lib/x86_64-linux-gnu/libz.so (found version “1.2.8”)
— Found OpenEXR: /usr/lib/x86_64-linux-gnu/libIlmImf.so
— checking for module ‘gstreamer-base-1.0’
— package ‘gstreamer-base-1.0’ not found
— checking for module ‘gstreamer-video-1.0’
— package ‘gstreamer-video-1.0’ not found
— checking for module ‘gstreamer-app-1.0’
— package ‘gstreamer-app-1.0’ not found
— checking for module ‘gstreamer-riff-1.0’
— package ‘gstreamer-riff-1.0’ not found
— checking for module ‘gstreamer-pbutils-1.0’
— package ‘gstreamer-pbutils-1.0’ not found
— checking for module ‘gstreamer-base-0.10’
— package ‘gstreamer-base-0.10’ not found
— checking for module ‘gstreamer-video-0.10’
— package ‘gstreamer-video-0.10’ not found
— checking for module ‘gstreamer-app-0.10’
— package ‘gstreamer-app-0.10’ not found
— checking for module ‘gstreamer-riff-0.10’
— package ‘gstreamer-riff-0.10’ not found
— checking for module ‘gstreamer-pbutils-0.10’
— package ‘gstreamer-pbutils-0.10’ not found
— Looking for linux/videodev.h
— Looking for linux/videodev.h – not found
— Looking for linux/videodev2.h
— Looking for linux/videodev2.h – found
— Looking for sys/videoio.h
— Looking for sys/videoio.h – not found
— checking for module ‘libavresample’
— package ‘libavresample’ not found
— Looking for libavformat/avformat.h
— Looking for libavformat/avformat.h – found
— Looking for ffmpeg/avformat.h
— Looking for ffmpeg/avformat.h – not found
— checking for module ‘libgphoto2’
— package ‘libgphoto2’ not found
CMake Warning at 3rdparty/ippicv/downloader.cmake:56 (message):
ICV: Local copy of ICV package has invalid MD5 hash:
d41d8cd98f00b204e9800998ecf8427e (expected:
808b791a6eac9ed78d32a7666804320e)
Call Stack (most recent call first):
3rdparty/ippicv/downloader.cmake:110 (_icv_downloader)
cmake/OpenCVFindIPP.cmake:237 (include)
cmake/OpenCVFindLibsPerf.cmake:12 (include)
CMakeLists.txt:537 (include)
— ICV: Downloading ippicv_linux_20151201.tgz…
CMake Error at 3rdparty/ippicv/downloader.cmake:73 (file):
file DOWNLOAD HASH mismatch
for file: [/home/gaurav/opencv-3.1.0/3rdparty/ippicv/downloads/linux-808b791a6eac9ed78d32a7666804320e/ippicv_linux_20151201.tgz]
expected hash: [808b791a6eac9ed78d32a7666804320e]
actual hash: [d41d8cd98f00b204e9800998ecf8427e]
Call Stack (most recent call first):
3rdparty/ippicv/downloader.cmake:110 (_icv_downloader)
cmake/OpenCVFindIPP.cmake:237 (include)
cmake/OpenCVFindLibsPerf.cmake:12 (include)
CMakeLists.txt:537 (include)
CMake Error at 3rdparty/ippicv/downloader.cmake:77 (message):
ICV: Failed to download ICV package: ippicv_linux_20151201.tgz.
Status=22;”HTTP response code said error”
Call Stack (most recent call first):
3rdparty/ippicv/downloader.cmake:110 (_icv_downloader)
cmake/OpenCVFindIPP.cmake:237 (include)
cmake/OpenCVFindLibsPerf.cmake:12 (include)
CMakeLists.txt:537 (include)
— Configuring incomplete, errors occurred!
See also “/home/gaurav/opencv-3.1.0/build/CMakeFiles/CMakeOutput.log”.
See also “/home/gaurav/opencv-3.1.0/build/CMakeFiles/CMakeError.log”.
hi
opencv working properly but I can not configure code blocks, if you can help me that would be great
thanks
hi,Samon,
Thank you for the guide!
I have an issue when I installed OpenCV at first step, these dependencies:
sudo apt-get install libqt4-opengl-dev
Reading package lists… Done
Building dependency tree
Reading state information… Done
Some packages could not be installed. This may mean that you have
requested an impossible situation or if you are using the unstable
distribution that some required packages have not yet been created
or been moved out of Incoming.
The following information may help to resolve the situation:
The following packages have unmet dependencies:
libqt4-opengl-dev : Depends: libgl1-mesa-dev
Depends: libglu1-mesa-dev but it is not going to be installed
E: Unable to correct problems, you have held broken packages.
This is a binary problem of adm64 and i386, but I don’t know how to solve it, could you help me please?
Thanks
You need to use either 32 or 64 bits libraries, depending on your system. Easiest way to fix is to start from scratch.
Code blocks is just an IDE, put the libraries and the include folders in its settings.
It is failing because it can’t download the IPP files. You can just disable it, or download them manually.
By the way, that’s OpenCV 3 but this is a guide for OpenCV 2.
Hi. Can you please detail out the steps for installation into Ubuntu 15.10. The steps produce an error at step 2.
If you need help, you should at least provide the error message.
Hi,
I have tried many different methods to install openCV but unable to do so. I have followed your steps but I’m getting an error at make : modules/highgui/CMakeFiles/opencv_highgui.dir/build.make:122: recipe for target ‘modules/highgui/CMakeFiles/opencv_highgui.dir/src/cap_ffmpeg.cpp.o’ failed
make[2]: *** [modules/highgui/CMakeFiles/opencv_highgui.dir/src/cap_ffmpeg.cpp.o] Error 1
CMakeFiles/Makefile2:1724: recipe for target ‘modules/highgui/CMakeFiles/opencv_highgui.dir/all’ failed
make[1]: *** [modules/highgui/CMakeFiles/opencv_highgui.dir/all] Error 2
Makefile:137: recipe for target ‘all’ failed
make: *** [all] Error 2
Please help.
It seems that there’s a problem with ffmpeg. Maybe you are using a different version, or you skipped some steps.
Hi! I have followed your tutorial and have installed everything correctly. When I tested the C++ and Java code, they worked fine. But when I tried python ~/opencv-2.4.9/samples/python2/turing.py, it resulted in an error import cv2
ImportError: No module named cv2. How can I solve this?
Thank you.
I have seen your previous comment:
Maybe they changed how Python bindings work in that release. Search for the correct python files and copy them accordingly.
How can I do this? I am a beginner at python. How can I search for the correct python bindings and copy them accordingly?
hi,
I have a problem when run a program
It is ” init done opengl support available”
what should I do
That’s not a problem. It is just telling you that OpenGL is available to use in your application. It’s part of the OpenCV log.
ubuntu 14.04 install openCV2.4.9
2016.09.05 this tutorial still work!
Thank you very much!
Hiiiiii
I got error at this stage of installation sudo gedit /etc/bash.bashrc
as “Failed to register: Timeout was reached”
It as almost last but one command
wiil u help me
please sir
Hey Sam,
Many thanks for this tutorial. I have already installed python and ipython notebook using anaconda. How to I make sure that opencv is succesfully imported while using ipython notebook? the path for python is inside anaconda directory. Please guide. Thank
Can you explain what this line is doing
PKG_CONFIG_PATH=$PKG_CONFIG_PATH:/usr/local/lib/pkgconfig
Since I couldn’t find any pkgconfig file in usr/local/lib folder
Hi Samontab,
I got the following error when I tried to “make” (compile and install)
make[2]: *** No rule to make target ‘/usr/include/x86_64-linux-gnu/../lib/libavcodec.a’, needed by ‘lib/libopencv_videoio.so.3.1.0’. Stop.
CMakeFiles/Makefile2:4067: recipe for target ‘modules/videoio/CMakeFiles/opencv_videoio.dir/all’ failed
make[1]: *** [modules/videoio/CMakeFiles/opencv_videoio.dir/all] Error 2
Makefile:160: recipe for target ‘all’ failed
make: *** [all] Error 2
please, I need your help.
Hey Nuel, I see that you’re installing opencv 3.1. Why not the latest 3.2? or 2.4.9 which is the one covered here?
Anyway, the error appears on the video components. It seems that you didn’t install the required libraries. Try installing them with:
sudo apt-get install libavcodec libavcodec-devOr just disable the video component in the opencv build (-D WITH_V4L=OFF)
Thanks a lot for the nice tutorial. It works!
Thanks for the nice tutorial!
Thanks a lot! Works perfect.
thank you very much.
Does this installation of opencv2 works in ubuntu 16.04 ???
Yeah, it should work for 16.04 with minor modifications
– OpenCV ARCH:
— OpenCV RUNTIME:
— OpenCV STATIC: OFF
CMake Warning at /home/siddharth/opencv-2.4.9/cmake/OpenCVConfig.cmake:161 (message):
Found OpenCV Windows Pack but it has not binaries compatible with your
configuration.
You should manually point CMake variable OpenCV_DIR to your build of OpenCV
library.
Call Stack (most recent call first):
CMakeLists.txt:11 (FIND_PACKAGE)
CMake Error at CMakeLists.txt:11 (FIND_PACKAGE):
Found package configuration file:
/home/siddharth/opencv-2.4.9/cmake/OpenCVConfig.cmake
but it set OpenCV_FOUND to FALSE so package “OpenCV” is considered to be
NOT FOUND.
— Configuring incomplete, errors occurred!
See also “/home/siddharth/opencv study/V009_07_Codes/07 – Calibrating and working with stereo images/05 – Generating a depth map/CMakeFiles/CMakeOutput.log”.
this is the error which it is showing when i compile the code of generating depth map
what are the modifications required for ubuntu 16.04
please can I know ??
Hello I am a Newbie trying to install opencv in 16.04
So, Please can I know how to install it
Or please can I know any references or any website which on reading will guide me to make it a successful installation
Hi sir,
To install opencv 2.4.9 in ubuntu 16.04, it requires some modifications
Sir, can I know some reference which i should refer to know about modifications
Or is there any tutorial which I should go through