OpenCV is the most popular computer vision library in the world, widely used in research and industry for more than twenty years. The latest version available at the time of writing is 4.7.0, and it comes with many new features and bug fixes across all modules.
We’re also going to include the extra modules so that we have access to the latest research in other areas such as the RGBD module for depth cameras. If you’re planning to buy a new depth camera, make sure to check this post to help you decide which one to get.
We’re going to be using Ubuntu 22.04 LTS for this guide, but it should be similar for other versions of Ubuntu. At the end of this tutorial, you will be able to make computer vision applications with OpenCV using either C++ or Python, and the extra modules will be available to you.
Let’s begin. The first step is to make sure you have everything up to date:
sudo apt-get update
sudo apt-get upgrade
Now let’s grab some dependencies:
sudo apt-get install build-essential cmake python3-numpy python3-dev python3-tk libavcodec-dev libavformat-dev libavutil-dev libswscale-dev libdc1394-dev libeigen3-dev libgtk-3-dev libvtk7-qt-dev
Time to grab the source code of OpenCV and the extra modules, configure it and compile it:
mkdir ~/opencv
cd ~/opencv
wget https://github.com/opencv/opencv/archive/refs/tags/4.7.0.tar.gz
tar -xvzf 4.7.0.tar.gz
rm 4.7.0.tar.gz
wget https://github.com/opencv/opencv_contrib/archive/refs/tags/4.7.0.tar.gz
tar -xvzf 4.7.0.tar.gz
rm 4.7.0.tar.gz
cd opencv-4.7.0
mkdir build
cd build
cmake -D WITH_TBB=ON -D BUILD_opencv_apps=ON -D BUILD_NEW_PYTHON_SUPPORT=ON -D WITH_V4L=ON -D INSTALL_C_EXAMPLES=ON -D INSTALL_PYTHON_EXAMPLES=ON -D BUILD_EXAMPLES=ON -D WITH_QT=ON -D WITH_OPENGL=ON -D WITH_VTK=ON .. -DCMAKE_BUILD_TYPE=RELEASE -DOPENCV_EXTRA_MODULES_PATH=../../opencv_contrib-4.7.0/modules
make -j`nproc`
sudo make install
echo '/usr/local/lib' | sudo tee --append /etc/ld.so.conf.d/opencv.conf
sudo ldconfig
echo 'PKG_CONFIG_PATH=$PKG_CONFIG_PATH:/usr/local/lib/pkgconfig' | sudo tee --append ~/.bashrc
echo 'export PKG_CONFIG_PATH' | sudo tee --append ~/.bashrc
source ~/.bashrc
Now you should have OpenCV correctly installed, and you should be able to start building your computer vision applications in either C++ or Python. Let’s get you started with some examples.
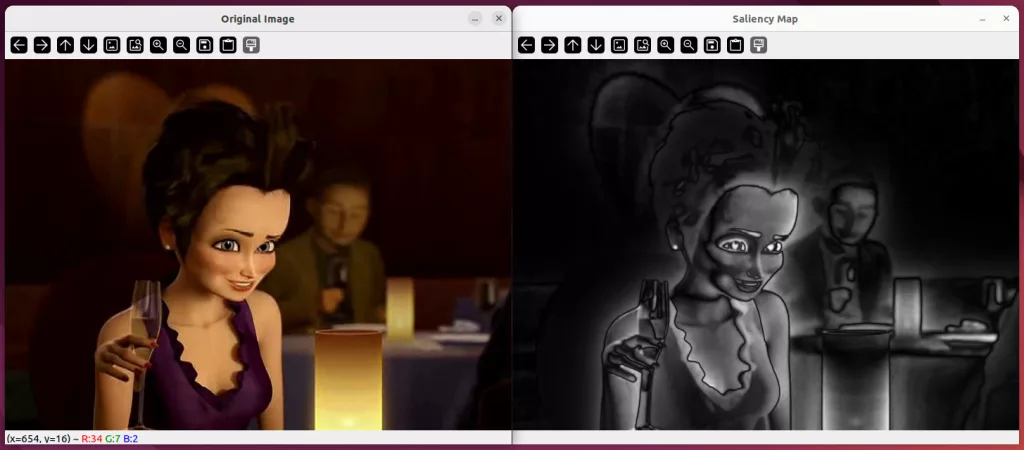
We’re going to create a C++ application based on one of the examples included in the extra modules of OpenCV. It’s an application that generates Fine-Grained saliency based on this paper. And we’re going to use CMake to configure it so that you can use the same project structure later for your own applications. The first step is to grab the sample files:
cd ~
mkdir saliency
cd saliency
cp ../opencv/opencv_contrib-4.7.0/modules/saliency/samples/computeSaliency.cpp .
cp ../opencv/opencv-4.7.0/samples/data/Megamind.avi .
We’re now going to create a new text file in that same directory called CMakeLists.txt so that cmake can understand how to build it.
nano CMakeLists.txt
Paste this content into the file, save it(Ctrl+O) and then exit(Ctrl+X).
cmake_minimum_required (VERSION 3.0.2)
project (saliency)

find_package(OpenCV REQUIRED)
include_directories( ${OpenCV_INCLUDE_DIRS} )
include_directories( . )

add_executable (${PROJECT_NAME} computeSaliency.cpp )
target_link_libraries (${PROJECT_NAME} ${OpenCV_LIBS})
And now we’re ready to build the application:
mkdir build
cd build
cmake ..
make
We can now run the application. It expects as arguments the type of saliency (FINE_GRAINED), a video file (../Megamind.avi), and a frame number to use (23):
./saliency FINE_GRAINED ../Megamind.avi 23
You are now ready to start making your own computer vision application in C++.
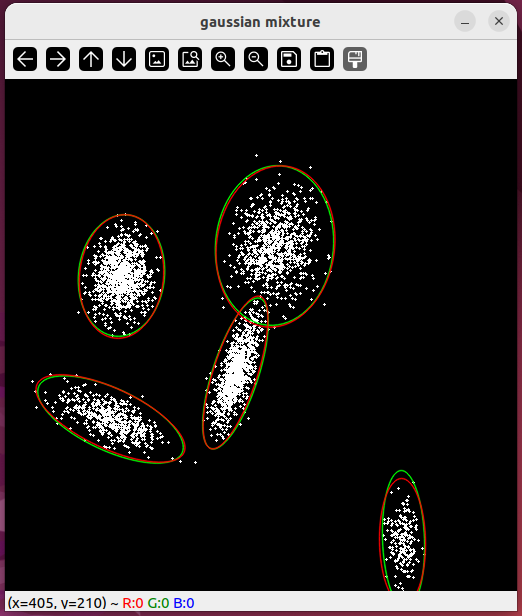
Now let’s see how we can run a Python example as well:
mkdir ~/python_app
cd ~/python_app
cp ../opencv/opencv-4.7.0/samples/python/gaussian_mix.py .
python3 gaussian_mix.py
Now you should be able to build your own computer vision applications, with either C++ or Python.
Enjoyed the tutorial?


0 Responses
Stay in touch with the conversation, subscribe to the RSS feed for comments on this post.