A screencast is basically a video of your computer screen with your voice as the audio. A screencast is very useful for tutorials or teaching how to use something with your computer.
There are a couple of paid programs that allow you to create screencasts, but in this post I will show you how to make them using only free tools(although you need to be running Windows for this tutorial, which is not free, sorry about that).
The first step is to download and install the codec that will allow us to compress the video. We are going to use one of the best standards for HD video: H.264/MPEG-4 AVC. The specific implementation to install here is x264vfw.
You need to install the 32 bits version (even if you have a 64 bits system). After you install the 32 bits version, try to install the 64 bits version as well (you may not be able to do it in a 32 bit system).
Now, install the latest version of camstudio. It is a great program that will allow you to record your voice and your desktop. Make sure that you also install the Lossless Video Codec as well.
OK, now you should have camstudio and its Lossless Video Codec installed. Make sure that you have your mic and/or video camera connected to your computer. Now we are going to configure camstudio to make it screencast ready.
Start camstudio and set the following options:
- Options-> Record audio from microphone
- Options-> Program Options -> Play AVI file when recording stops -> Do not play AVI file
- Options-> Program Options -> Name of AVI file -> Automatic file naming (use date and time)
- Options-> Program Options -> Minimize program on start recording (not checked)
- Options-> Program Options -> Directory for recording -> Use user specified directory… (and specify a directory where you want your videos to be saved)
Now, go to Options-> Video options, and select the following:
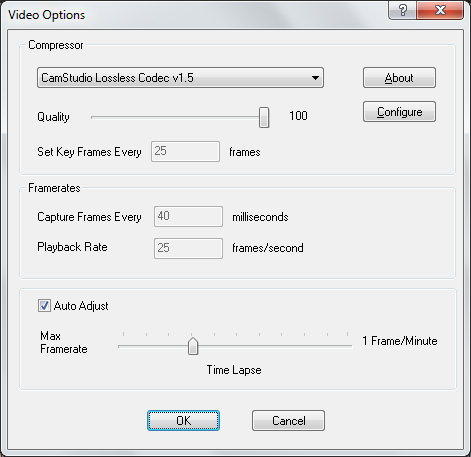
- Compressor: CamStudio Lossless Codec 1.5 (or newer)
- Quality 100
- Select Auto Adjust
- Move the slider to where you have a Playback rate of 25 frames / second (the default one is 200 fps!)
Now go to Options-> Audio options-> Audio options for microphone, and select the following:
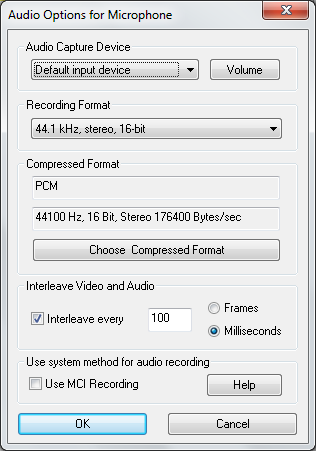
- Audio Capture Device: Select your device
- Recording Format, select 44.1kHz, stereo, 16 bit.
- Compressed format: PCM
Now we are going to set which area of the screen to record. Go to Region->Fixed Region and set these values:
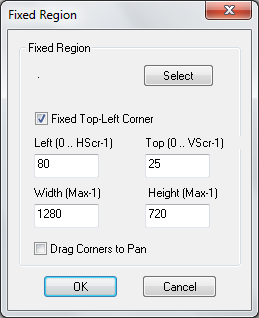
- Left: 80
- Top: 25
- Width: 1280
- Height: 720
The most important thing to note here is the width and height of 1280 and 720 respectively. This is widescreen HD format (720p) and it is very important that you use these values. If you use other, non standard values, you will end up with problems in your video. If you have a larger screen, you may want to use a width of 1920 and a height of 1080, which is even better (1080p). The other values, left and top, should be set depending on the actual area that you want to record of your desktop. Remember that left plus width and top plus height should be less or equal to your total screen width and height respectively.
Alternatively to selecting a specific region in your screen, you can first adjust your screen resolution to 1280×720 (or 1920×1080), and select Region-> Full Screen instead. I prefer using a region because you can show your software in your native resolution, and also you have the option to not show the clock, and the menu bar, etc. This is specially important for continuity when editing videos later.
OK, now go ahead and make a couple of quick tests. Click on the record button(red circle), start talking, moving your mouse, opening folders, etc. After some seconds, press stop(blue square). After a moment, a video should be waiting for you in the location you specified earlier without you having to do anything else. Go there and check it. Make sure that the video came out OK, that you can see the areas that you want, that your voice is loud and clear, that the video resolution and frame rate are what you expected, and that you are comfortable with this recording procedure. Also, always make sure that you have at least a couple of seconds at the beginning and at the end of your recordings. Specially at the end, because the encoding technique that we will use cuts one or two seconds at the end, depending on the length of your video.
Before you start doing real screencasts, let’s check a couple of issues. Camstudio is a great program, but sometimes it crashes, and it forgets all your settings, which is unfortunate (incredibly annoying and frustrating). That’s why it is good to save your preferences, which are stored in four files located at the installation directory (C:\Program Files (x86)\CamStudio 2.6b). Once you have set all your preferences, just copy these four files: Camdata.ini, CamLayout.ini, CamShapes.ini, CamStudio.ini into a safe place (C:\Users\Public\Documents\camstudioconfig for example). If camstudio crashes and forgets your preferences, simply close the software, copy your files back and continue normally.
After you record a couple of videos, you can edit them. We are going to use a video editor called virtualdub. Download and open it. Drag and drop a video there. You can now see all the frames that compose the video. You can select some frames and delete them for example. Also, you can append another video. You can also do many other things, but appending videos and removing frames is all you need to create a nice screencast. It is important that all your videos are recorded with the same settings, like width, height, even sound should be the same.
Before you edit a video, always check these settings in virtualdub:
- Make sure that Video->Full processing mode is selected
- Make sure that Audio->Direct stream copy is selected
Now, go to Video-> compression and select x264vfw:
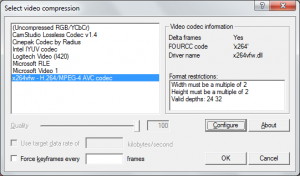
Click on configure and set the following options:
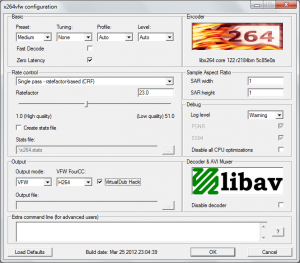
- enable zero latency
- enable virtualdub hack
Click OK, OK
Now you can edit the screencast by appending your videos, and removing frames. You can take a look at what virtualdub has to offer here.
Once you are finished editing your screencast, you can go to File->save as avi. It will generate the first version of your screencast, but we need to compress it even further and change it into a different format.
Now comes the final step. Install and open vlc and select Media->Convert/Save. Under file selection, click Add and select the AVI file you just created with virtualdub. Click on Convert/Save. On Destination folder, copy the same file path as the source, but end the filename with mp4 instead of avi. Under profile, make sure that Video H.264 + AAC (MP4) is selected. Click on start, and after some minutes, you will have your HD screencast ready in the same folder that you selected at the beginning.
Note:
If you need to make a screencast of Linux, or other operating system, you can use virtualbox. Just use it as a normal windows application, and everything will be recorded. Make sure that your region is set so that it covers the area that you want to record. If you are interested in a native application, you can take a look at recordmydesktop.
Note 2:
If you already have a recording in camstudio and want to change the frame rate, you can do that easily with virtualdub. Open the video in virtualdub, go to video, select direct stream copy. Go to video, select frame rate.
Under frame rate conversion, select convert to fps, and put 25 (or the desired value). Go to file, select save as avi. It should process the file quickly.


i can’t find x264vfw – h.264/mpeg-4 avc codec ….. where is it? where i have to copy it?
Hello j0IIy,
Just read the tutorial, it is available in the links contained in this section:
Thank you very much. it’s working now. :) (I’m not so good at English.)
It’s a great tutorial. Thank you.
Hello j0IIy,
Great to know that it worked for you.
0 down vote
If you need something less complicated try rec, which is mine :) https://sites.google.com/site/joopeter/
It is also free, lossless but more efficient and accurate!
Thanks Peter, I will check it out next time I need to record a screencast.
Yep, there are many tools, maybe this one suits the needs of yours ;)
How do you connect X264vfw to Cam Studio? I have X264vfw installed on my lap top but I do not see it on the drop down list in CamStudio. Thanks
It should just appear on the list.
Remember to install both, the 32 and 64 bits version of it.
Thanks for post!