OpenCV is an awesome free open source library for computer vision, image processing, and even some machine learning.
Sage is an awesome free open source mathematical software system that integrates many other libraries and software into a single, easy to use interface for all your math needs.
I really like both projects, and have been using them separately, but in this post I will show you how you can use OpenCV in the Sage environment. This means that you will be able to use all the power of the Sage Notebook Server, NumPy, SciPy, Matplotlib, PIL (Python Imaging Library), R, and almost a hundred other open source packages for all your image processing needs.
The first step is to install the latest version of OpenCV in your system with the new Python bindings. You must have the Python bindings working correctly for this to work. The easiest way of doing this is to follow my own tutorial for installing OpenCV. You can easily change the version for installing the latest OpenCV version that is out there, the tutorial should still work. I used it to install OpenCV 2.4.3 in Ubuntu 12.10, and it worked perfectly.
To make sure that OpenCV is installed correctly, go to the console and start Python by running this command:
python
You should see the python console waiting for you. There, write the following:
import cv2
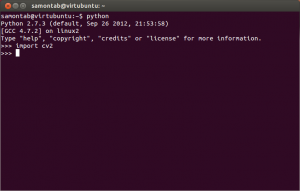
If no error appeared, everything is great, you can continue. If there are some errors, you need to fix them first. You can exit with Control-D, or by typing exit().
By the way, currently there are two OpenCV Python modules, cv and cv2. The legacy C version API of OpenCV can be accessed via cv, and the new C++ interface of OpenCV is available via cv2. Therefore, you are encouraged to use cv2 because that’s where the good stuff is.
Now that we have OpenCV with Python correctly installed, we need to install Sage.
First, check if you are running a 32 or 64 bit system by using this command:
uname -m
You will see x86_64, which means 64 bits or something like i686 or i386, which means 32 bits.
Now we need to download Sage from here. You can pick where to download from, as well as if you want the 32 or 64 bits version. I usually download it from the University of Washington which is where the lead developer of Sage, William Stein, teaches math but you can choose any other location that you like. You are looking for a file that has a name similar to this one: sage-5.4.1-linux-32bit-ubuntu_12.04.1_lts-i686-Linux.tar.lzma. For the next steps, I will be using that file. Remember that you may need to change the file or folder names for your specific situation.
After you download the file, you will need to extract it. On the console, change your directory to where you downloaded the file and extract it:
cd ~/Downloads
tar --lzma -xf sage-*
Now you will have to wait for a few minutes for it to decompress a lot of files. Notice how I did not use the verbose option for extracting (I used -xf instead of -xvf). This is because it takes a lot longer to decompress when it has to output every file name. Since nothing is being printed on the screen, it is faster but you may think that nothing is happening. Don’t worry, everything is fine. Just leave it alone until it finishes decompressing.
Now we are going to configure it so that we can call it from anywhere.
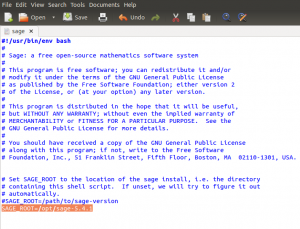
mv sage-5.4.1-linux-32bit-ubuntu_12.04.1_lts-i686-Linux sage-5.4.1
sudo mv sage-5.4.1 /opt/
sudo cp /opt/sage-5.4.1/sage /usr/local/bin/
sudo gedit /usr/local/bin/sage
- Copy the line that says #SAGE_ROOT=/path/to/sage-version.
- Remove the comment character (#) in the line you just copied.
- Change the path to /opt/sage-5.4.1 (or the version you are installing).
- Save the file and close the editor.
And now you can start Sage by using this command anywhere:
sage
You will have to wait for a few moments this first time you run it. You should then see the command prompt of Sage waiting for your input. Exit for now by running this command:
exit
If everything is fine, you can now delete the downloaded file to save some space:
rm ~/Downloads/sage-5.4.1-linux-32bit-ubuntu_12.04.1_lts-i686-Linux.tar.lzma
OK, so now we also have Sage correctly installed in the system.
Let’s install OpenCV into Sage:
cd /usr/local/lib/python2.7/dist-packages/
cp cv2.so /opt/sage-5.4.1/local/lib/python2.7/site-packages/
cp cv.py /opt/sage-5.4.1/local/lib/python2.7/site-packages/
cd ~
To make sure that OpenCV is correctly installed in Sage, go to the console and start Sage by running this command:
sage
You should see the Sage console waiting for you. There, write the following:
import cv2
If no error appeared, everything is great, you can continue. If there are some errors, you need to fix them first. At this point, it should report the following error:
RuntimeError: module compiled against API version 6 but this version of numpy is 4.
This happens because Sage(as of v5.4.1) still comes with an older version of NumPy(v1.5.1). You can tell which is the included version of NumPy by doing this in Sage:
import numpy
numpy.version.version
exit
So, if you have a newer version of Sage (this fix is scheduled for v5.6), and did not get the error, you can skip the next step.
Let’s update Sage’s NumPy to v1.7.0b2 so that we can use OpenCV with it:
cd ~
wget https://spkg-upload.googlecode.com/files/numpy-1.7.0b2.spkg
sage -f numpy-1.7.0b2.spkg
Now you should be able to run OpenCV functions in Sage.
Let’s use the Sage Notebook interface with OpenCV.
Start sage, run notebook(), and follow the instructions for using the notebook interface. For more advanced options for the notebook server, you can check here.
Once you have a new worksheet open, define some functions to convert arrays between NumPy, OpenCV and PIL:
import cv2, numpy, Image, ImageDraw

def cv2np(image):
rgbimage = cv2.cvtColor(image, cv2.COLOR_BGR2RGB)
return rgbimage/255.

def pil2np(image):
rgbimage = numpy.array(image)
return rgbimage/255.

def cv2pil(image):
rgbimage = cv2.cvtColor(lenna, cv2.COLOR_BGR2RGB)
pilimage = Image.fromarray(rgbimage)
return pilimage
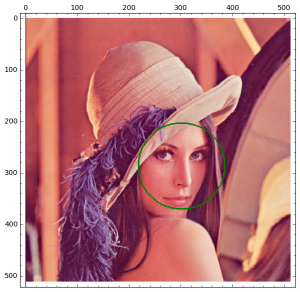
Now, in another cell let’s load an image and find a face using the trained frontal face model. (Make sure that you change the path to your image):
image_path = "/home/username/OpenCV-2.4.3/samples/c/lena.jpg"
lenna = cv2.imread(image_path, cv2.CV_LOAD_IMAGE_COLOR)
cascade_fn = "/usr/local/share/OpenCV/haarcascades/haarcascade_frontalface_alt.xml"
cascade = cv2.CascadeClassifier(cascade_fn)
gray = cv2.cvtColor(lenna, cv2.COLOR_BGR2GRAY)
rects = cascade.detectMultiScale(gray, scaleFactor=1.2, minNeighbors=4, minSize=(30,30))
for x1, y1, width, height in rects:
faces_rectangle = [x1, y1, x1 + width, y1 + height]
faces_rectangle
If you use lena.jpg, you should see the following result:
[217, 203, 386, 372]
Which is the location of the bounding box of the detected face of Lenna.
Now, let’s use PIL to draw the detection:
lenna_pil = cv2pil(lenna)
draw = ImageDraw.Draw(lenna_pil)
draw.ellipse((x1, y1, x1+width, y1+height), outline="green")
draw.ellipse((x1+1, y1+1, x1+width-1, y1+height-1), outline="green")
draw.ellipse((x1+2, y1+2, x1+width-2, y1+height-2), outline="green")
To be able of changing the thickness of the ellipse in PIL, you need to install the aggdraw module, so I just drew three ellipses instead.
Finally, it is time to show the detection:
matrix_plot(pil2np(lenna_pil)).show( axes=True, frame=True, figsize=8, aspect_ratio=1)

And that’s it. This is just a simple example of object detection in OpenCV using the Sage environment. Feel free to explore Sage and OpenCV now that you can use them in the same interface.